How to use MONIQO
Step-by-step instructions, screenshots, and answers to common questions — everything you need to get the most from MONIQO.
Set up MONIQO in minutes
When you first open MONIQO, a short onboarding flow walks you through adding your first subscriptions and a payment source. Here's what each step does.
Select English or Russian. You can change this later in Settings → Appearance.
Pick your primary currency. MONIQO supports USD, EUR, GBP, CAD, AUD, SEK, DKK, NOK, SGD, CHF, RUB, and TRY, so you can track services in multiple currencies.
Choose categories that match what you're subscribed to — Video, Music, Cloud, AI, Business, and more. MONIQO will show relevant services from its 790+ catalog.
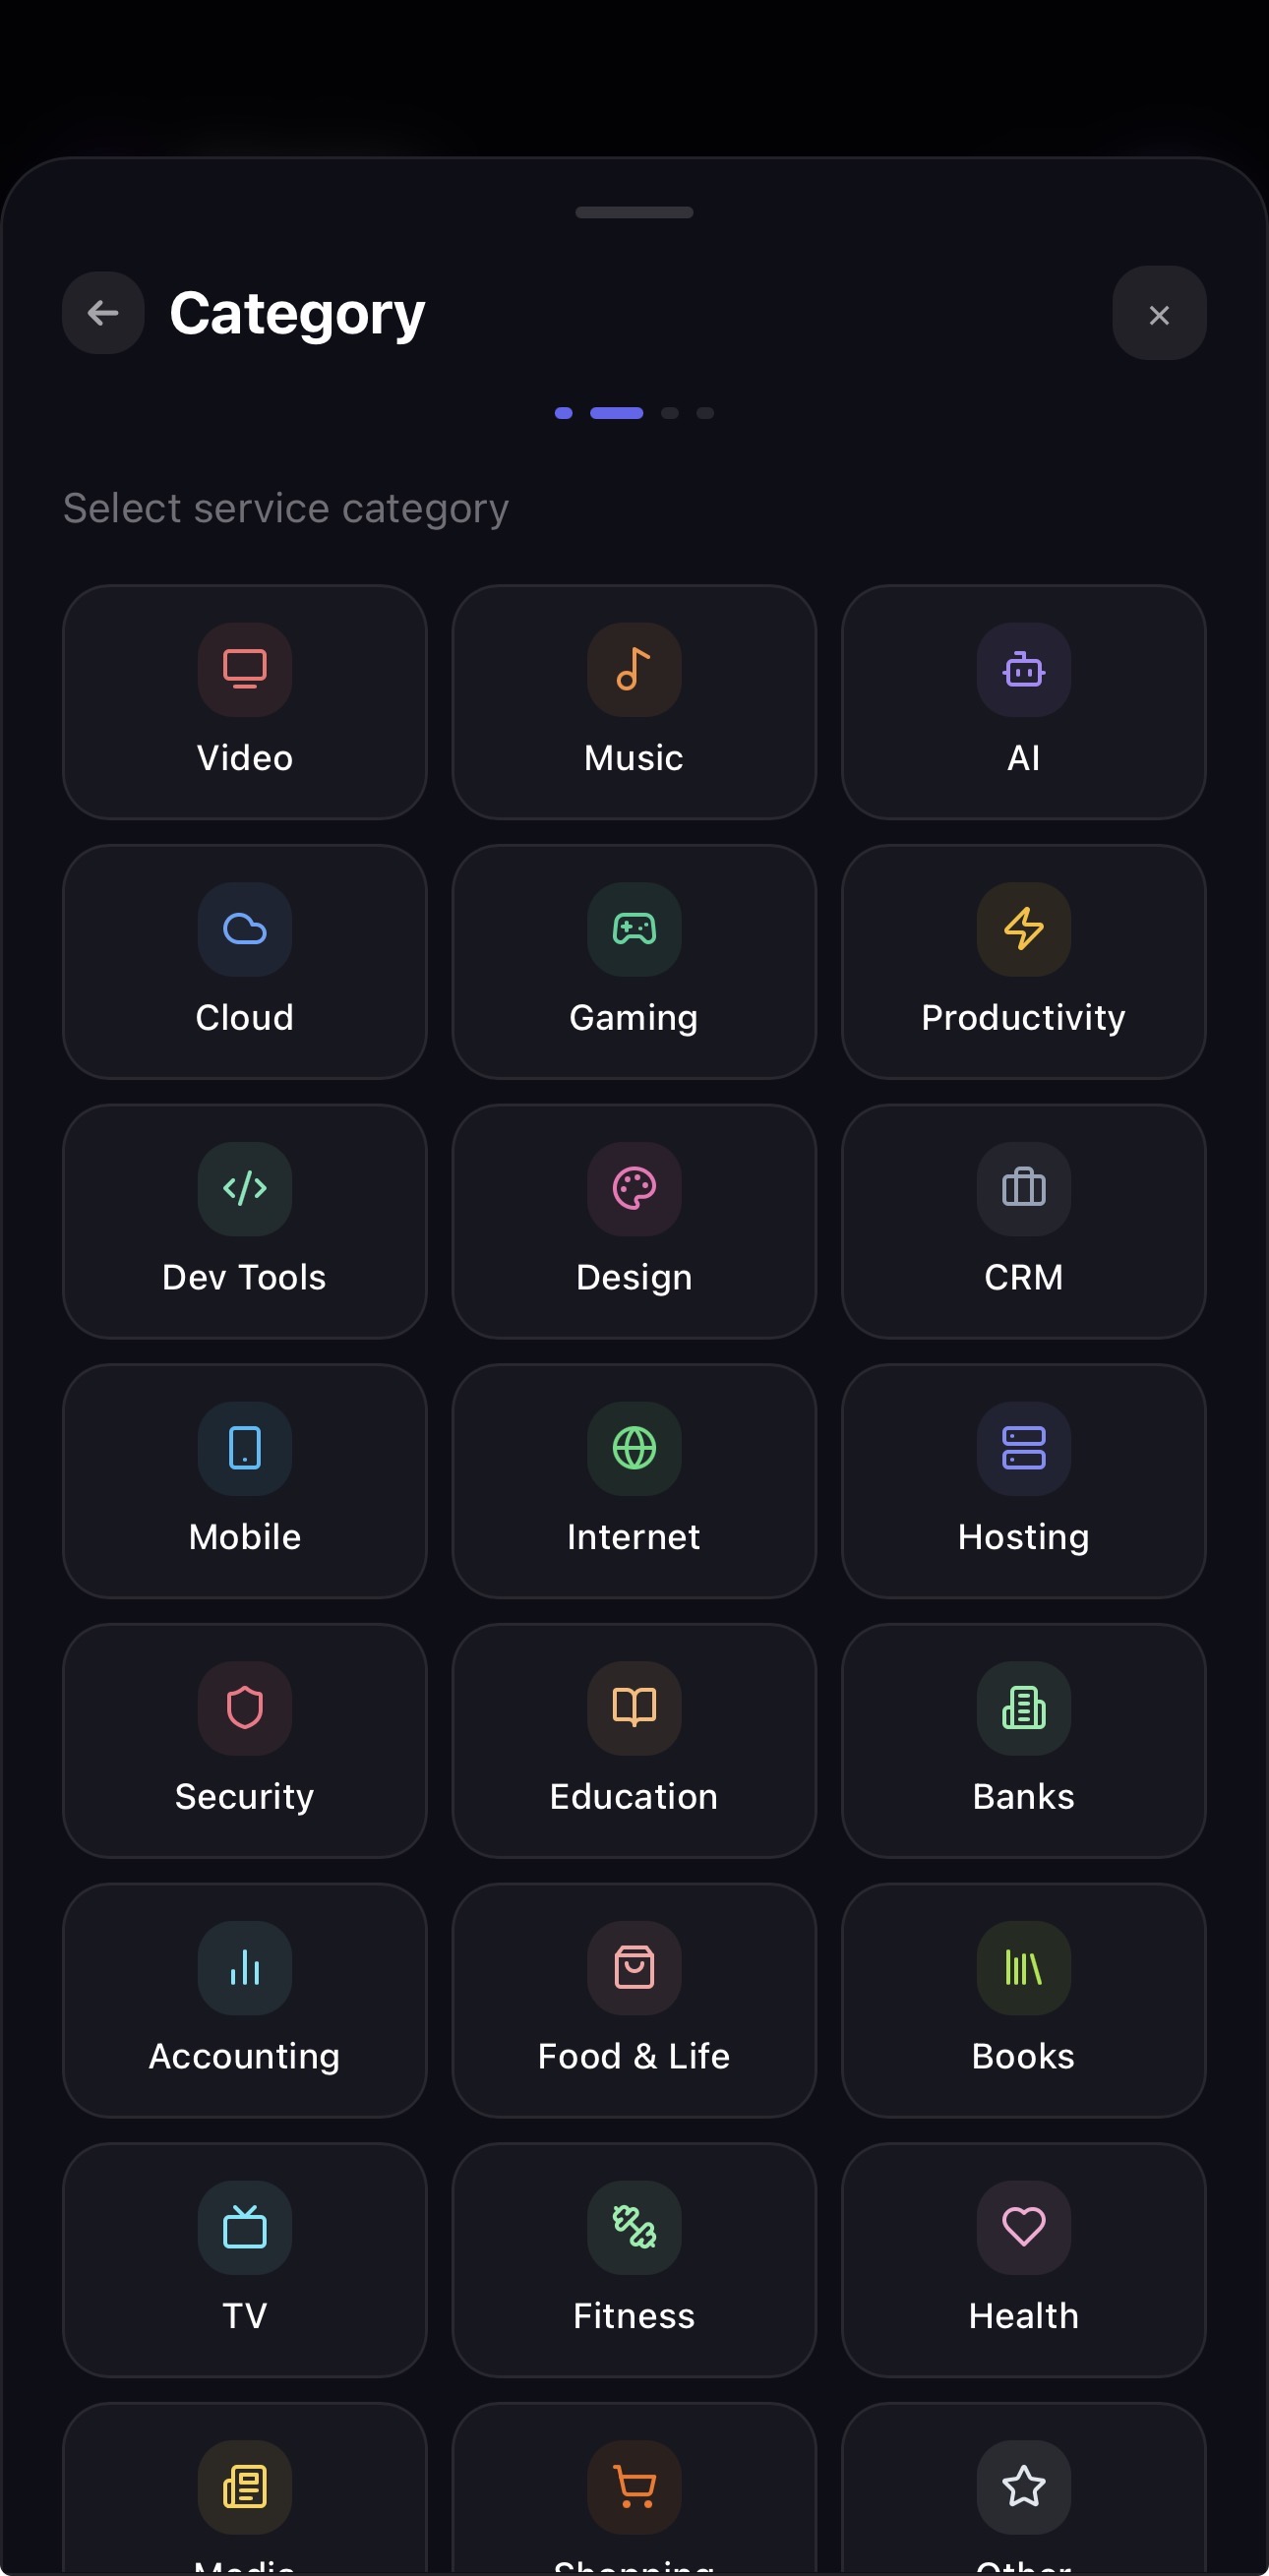 16 categories to choose from
Browse the catalog and tap the services you're subscribed to. MONIQO autofills the name, logo, and default billing cycle for each one.
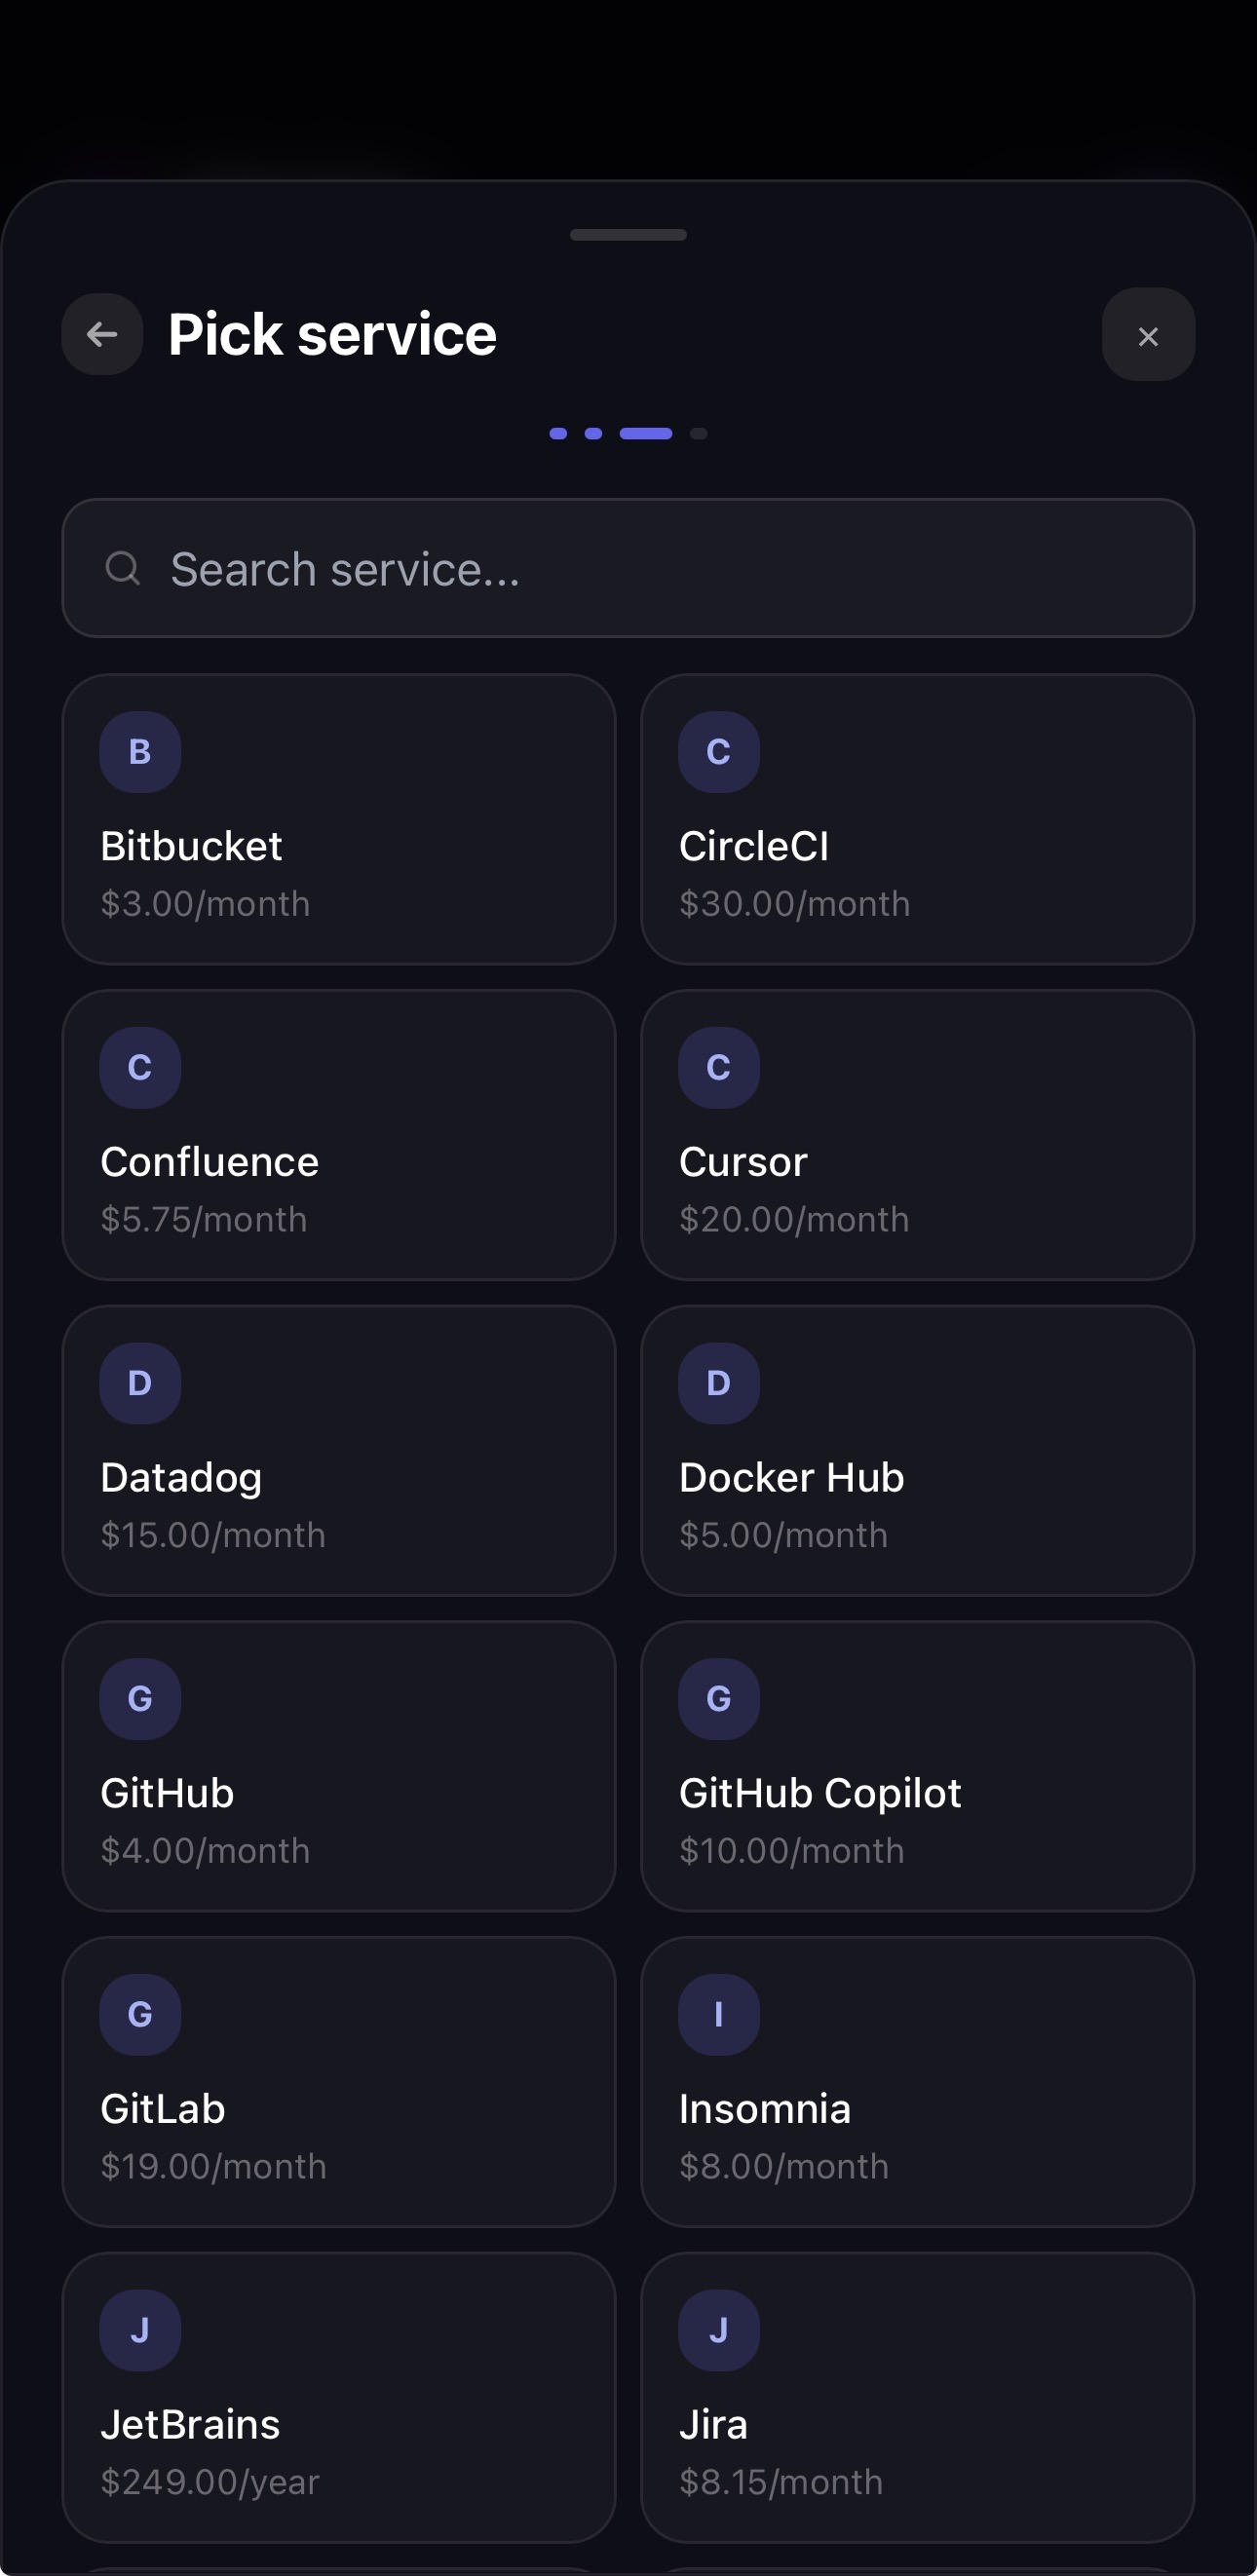 Tap to select — details are autofilled
Review amount, billing cycle, and next charge date for each selected service. Adjust anything that differs from your actual plan.
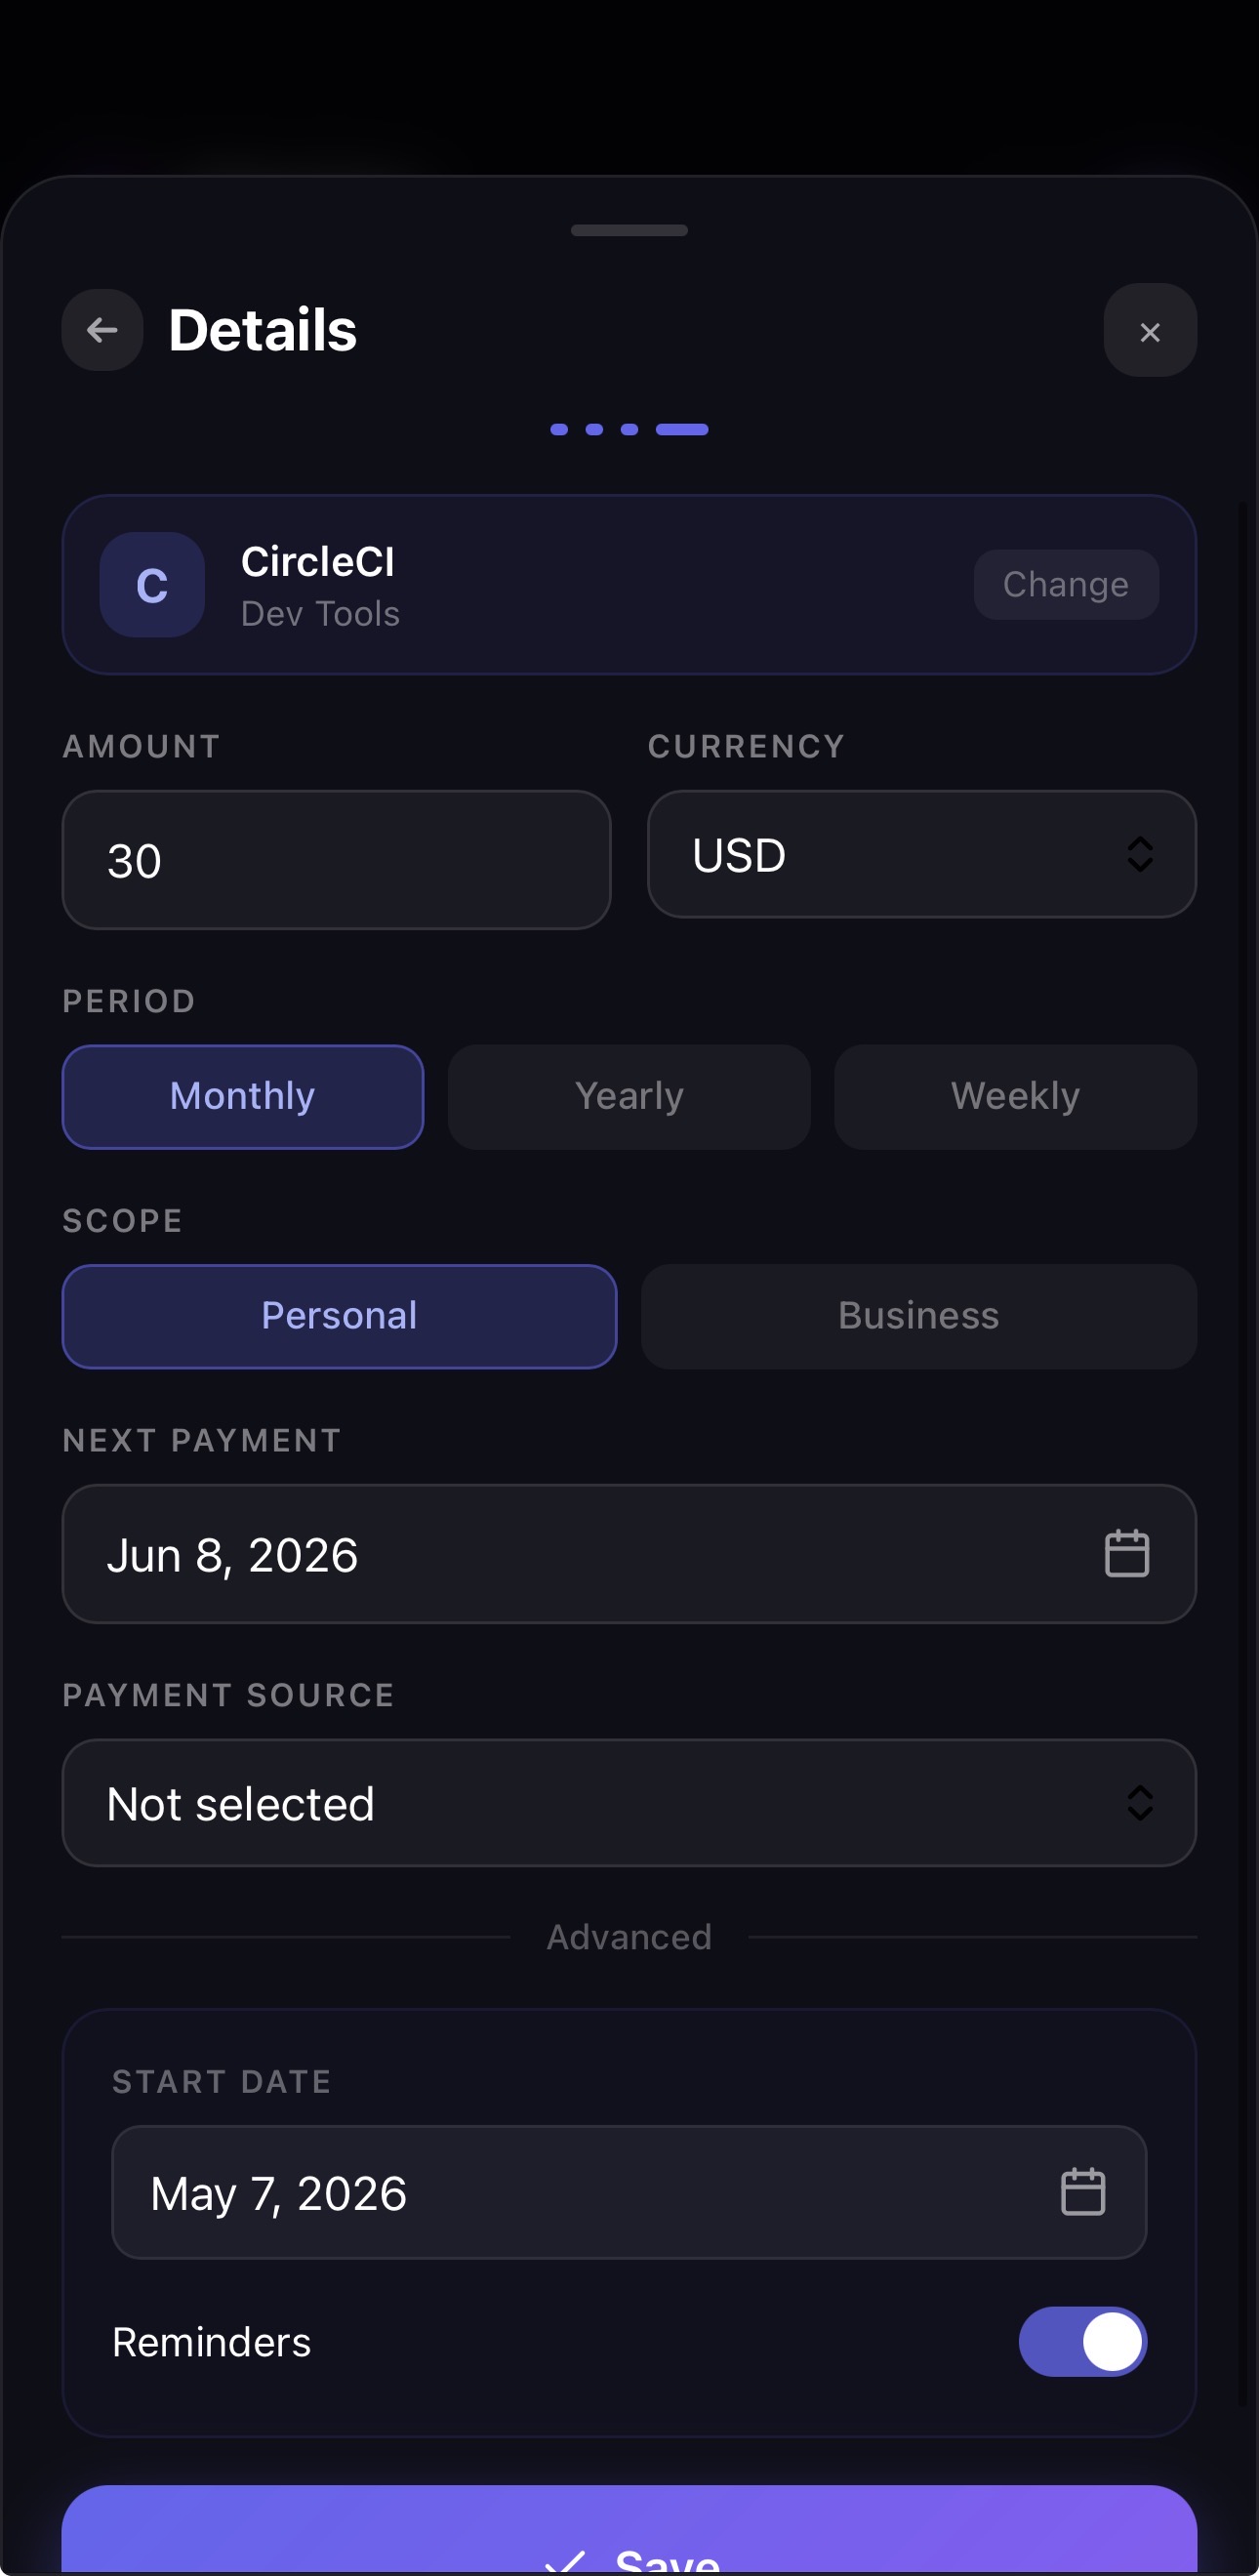 Edit amount and cycle before confirming
Add the card or account that pays for these services. Give it a name (e.g. "Main card") and optionally the last 4 digits. MONIQO uses this as a label — it never connects to your bank.
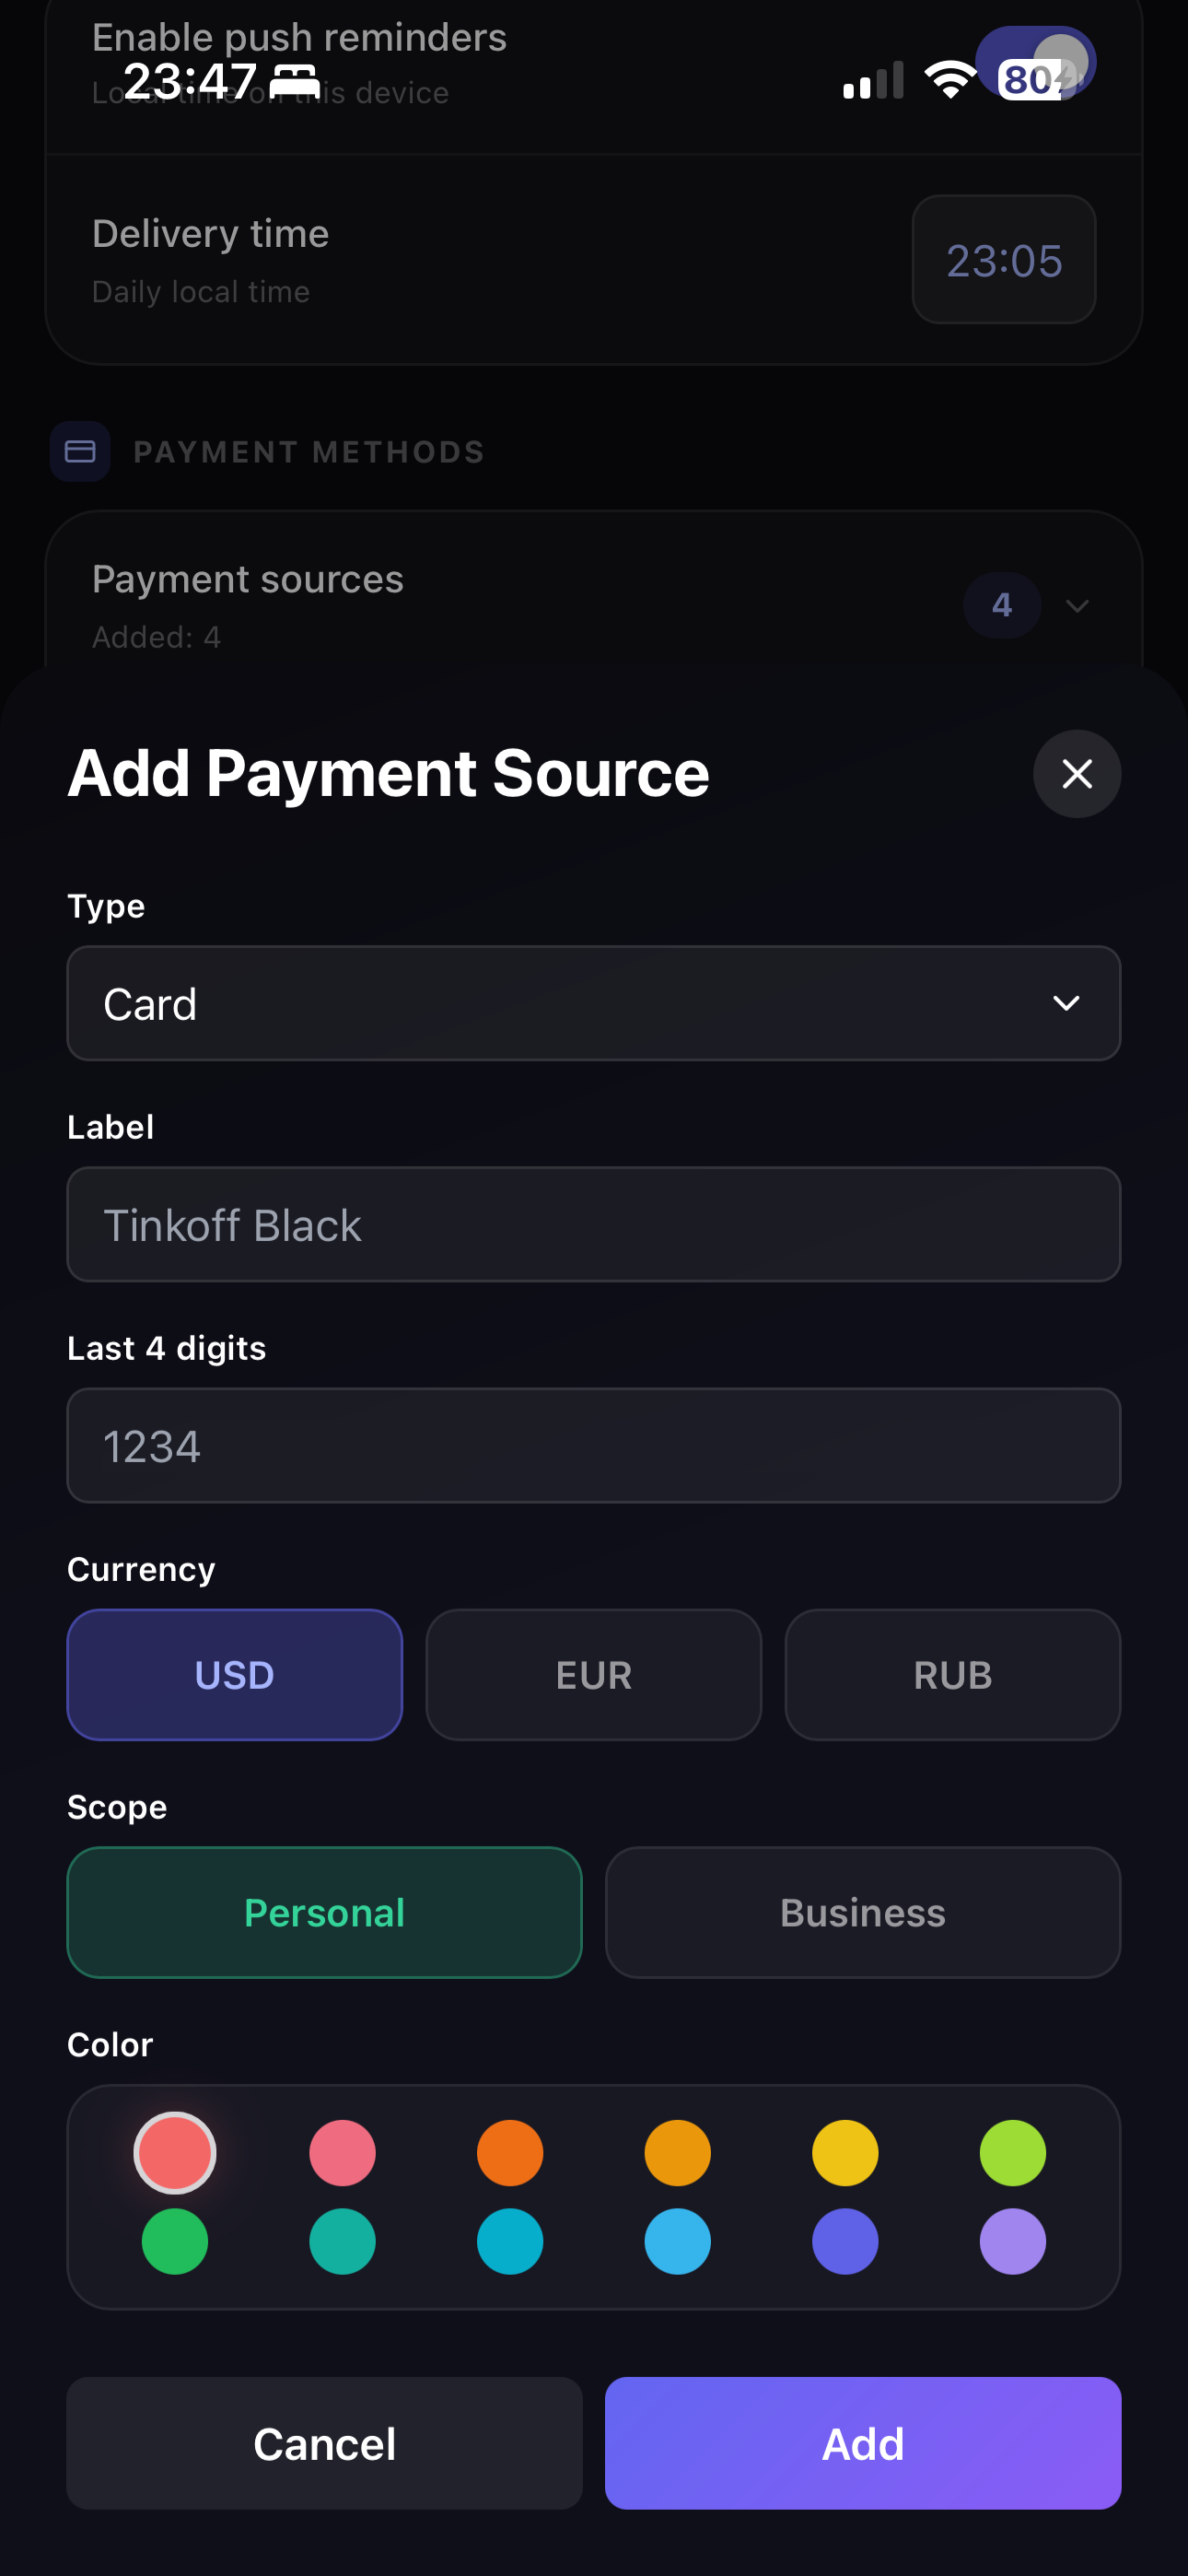 Card, account, or cash — any source works
Your dashboard is ready. You'll see monthly spending, upcoming charges, financial load, reminders, and payment history.
You can add more obligations from Dashboard or Optimize, and manage payment sources in Settings.
Your command center
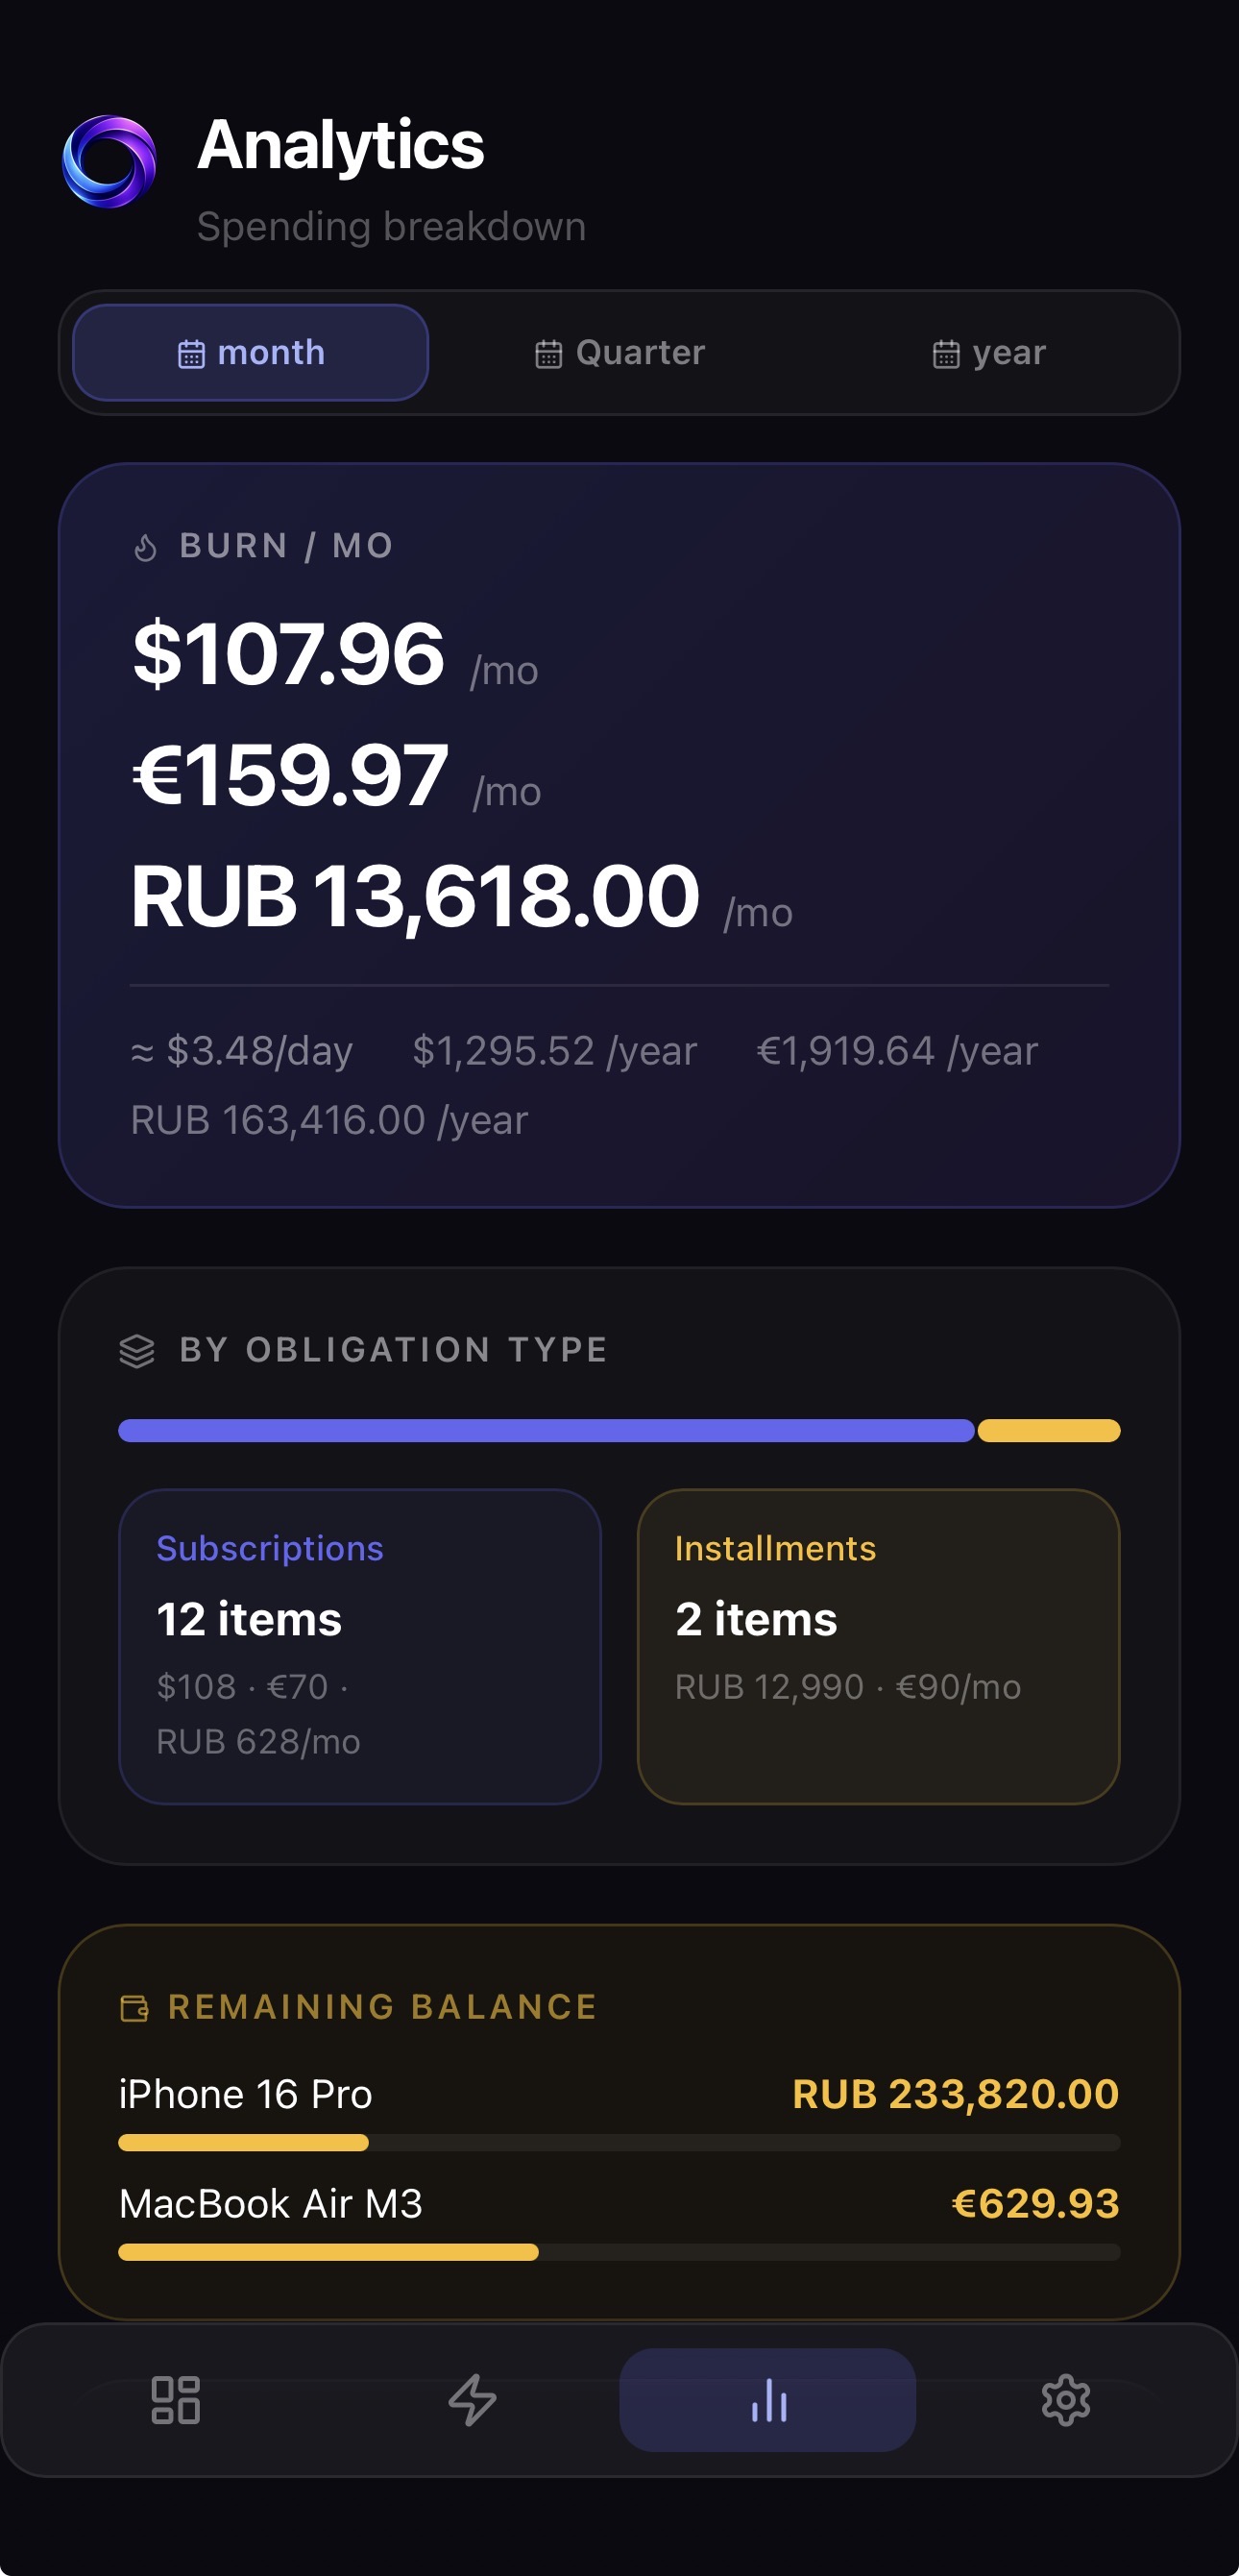
The Dashboard gives you a real-time overview of your recurring obligations — monthly burn, upcoming charges, 30-day money flow, financial load, reminders, and recent payment history.
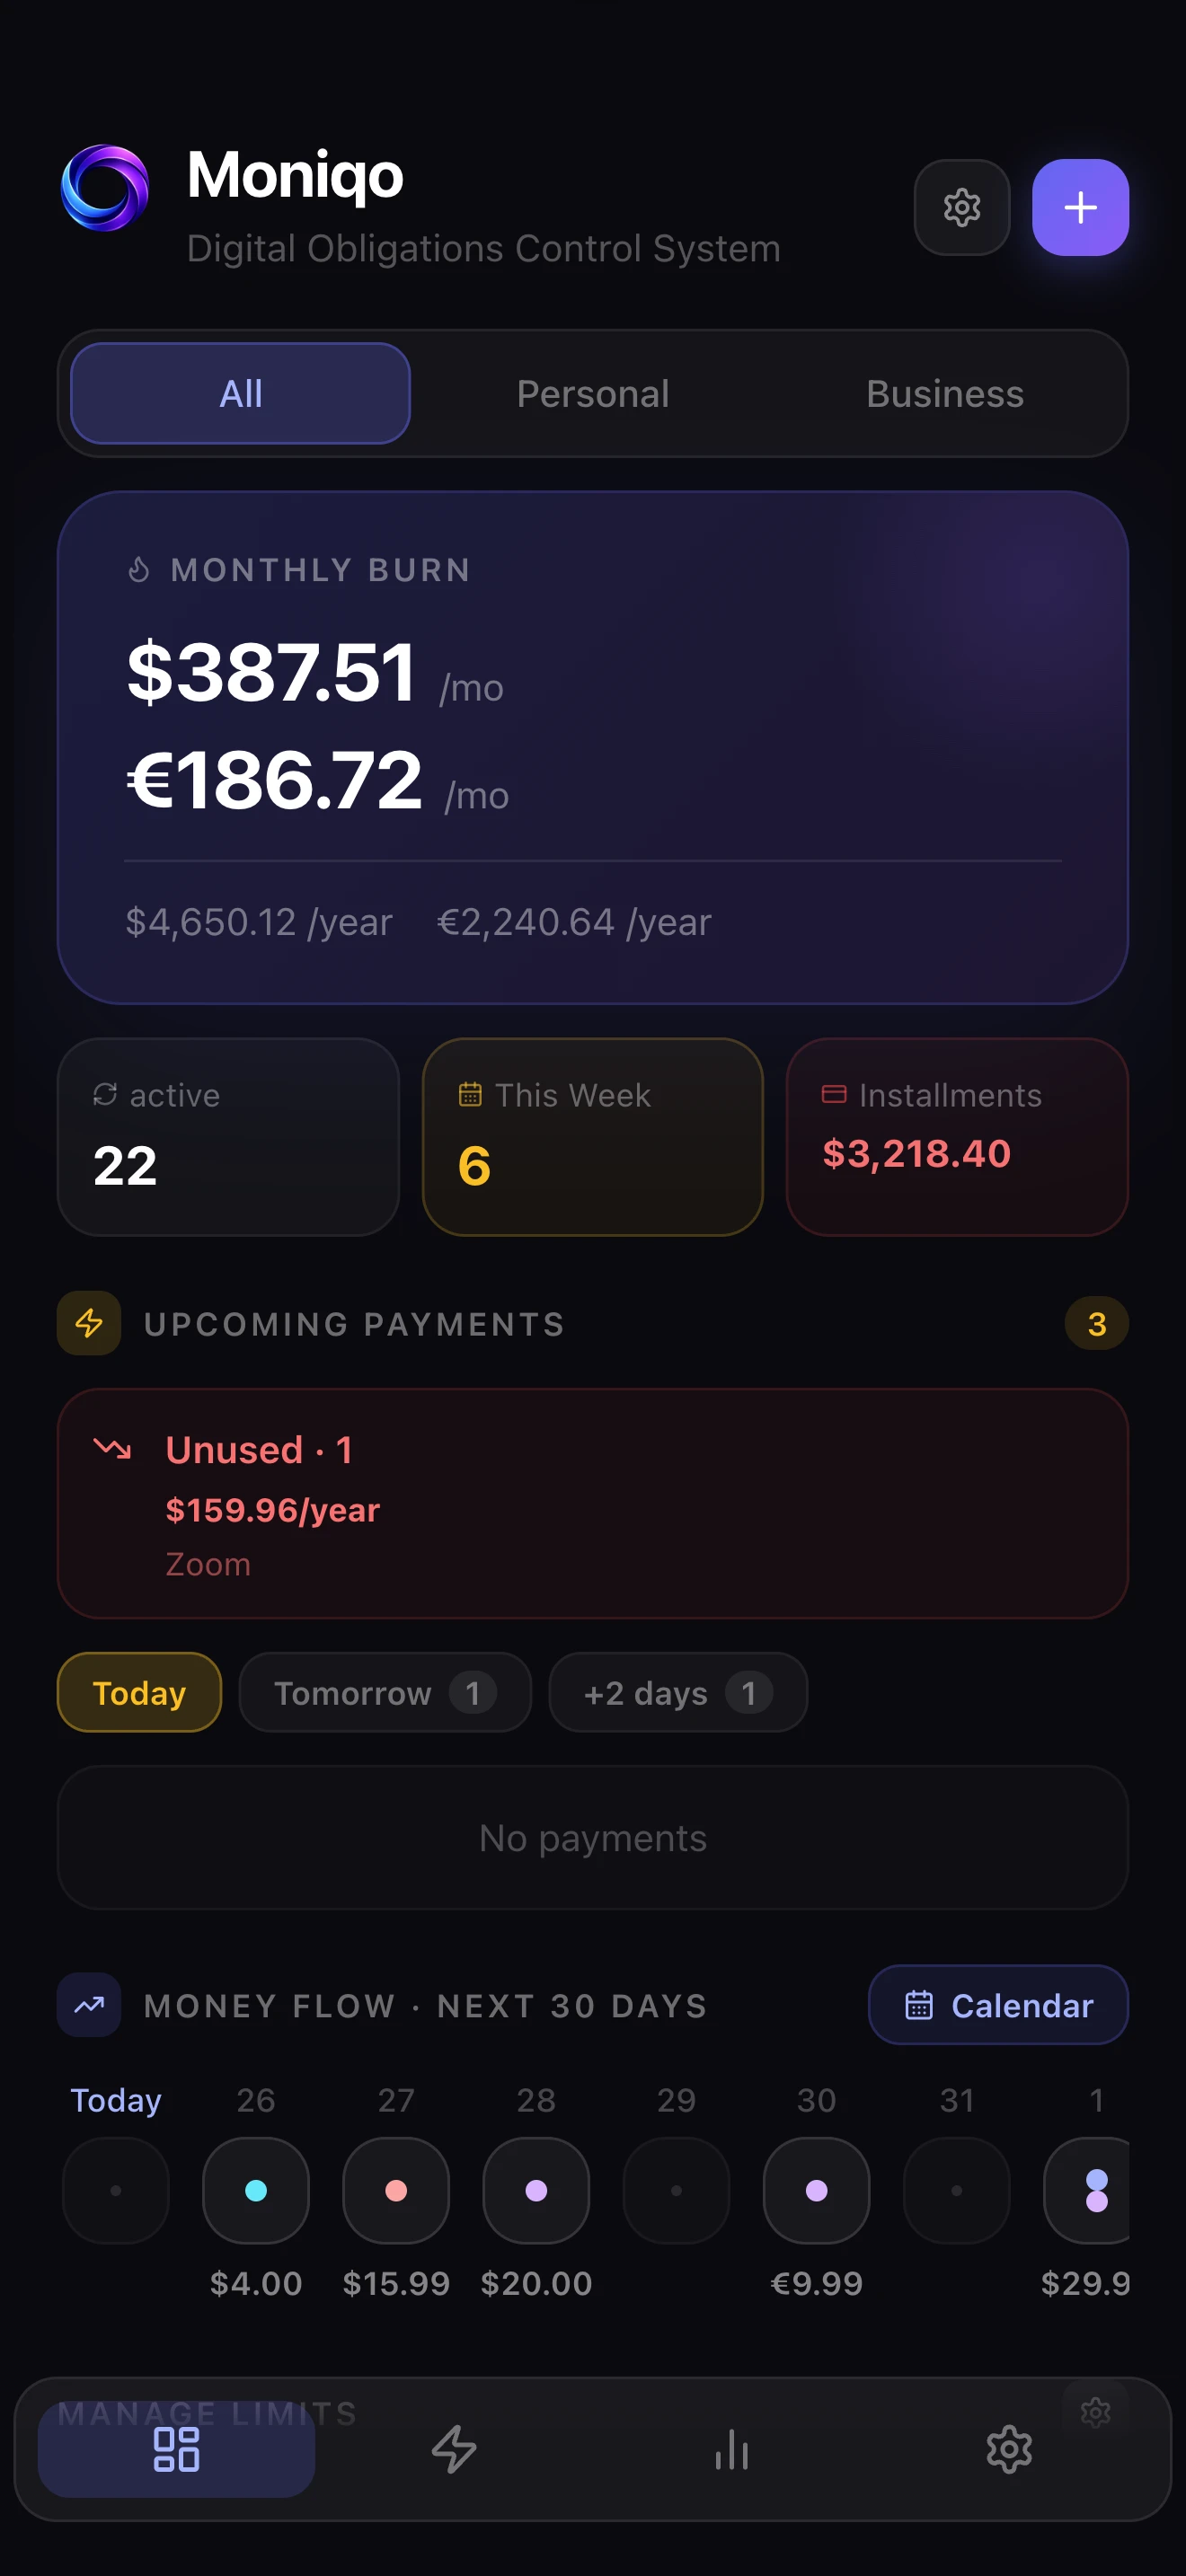 Main dashboard overview
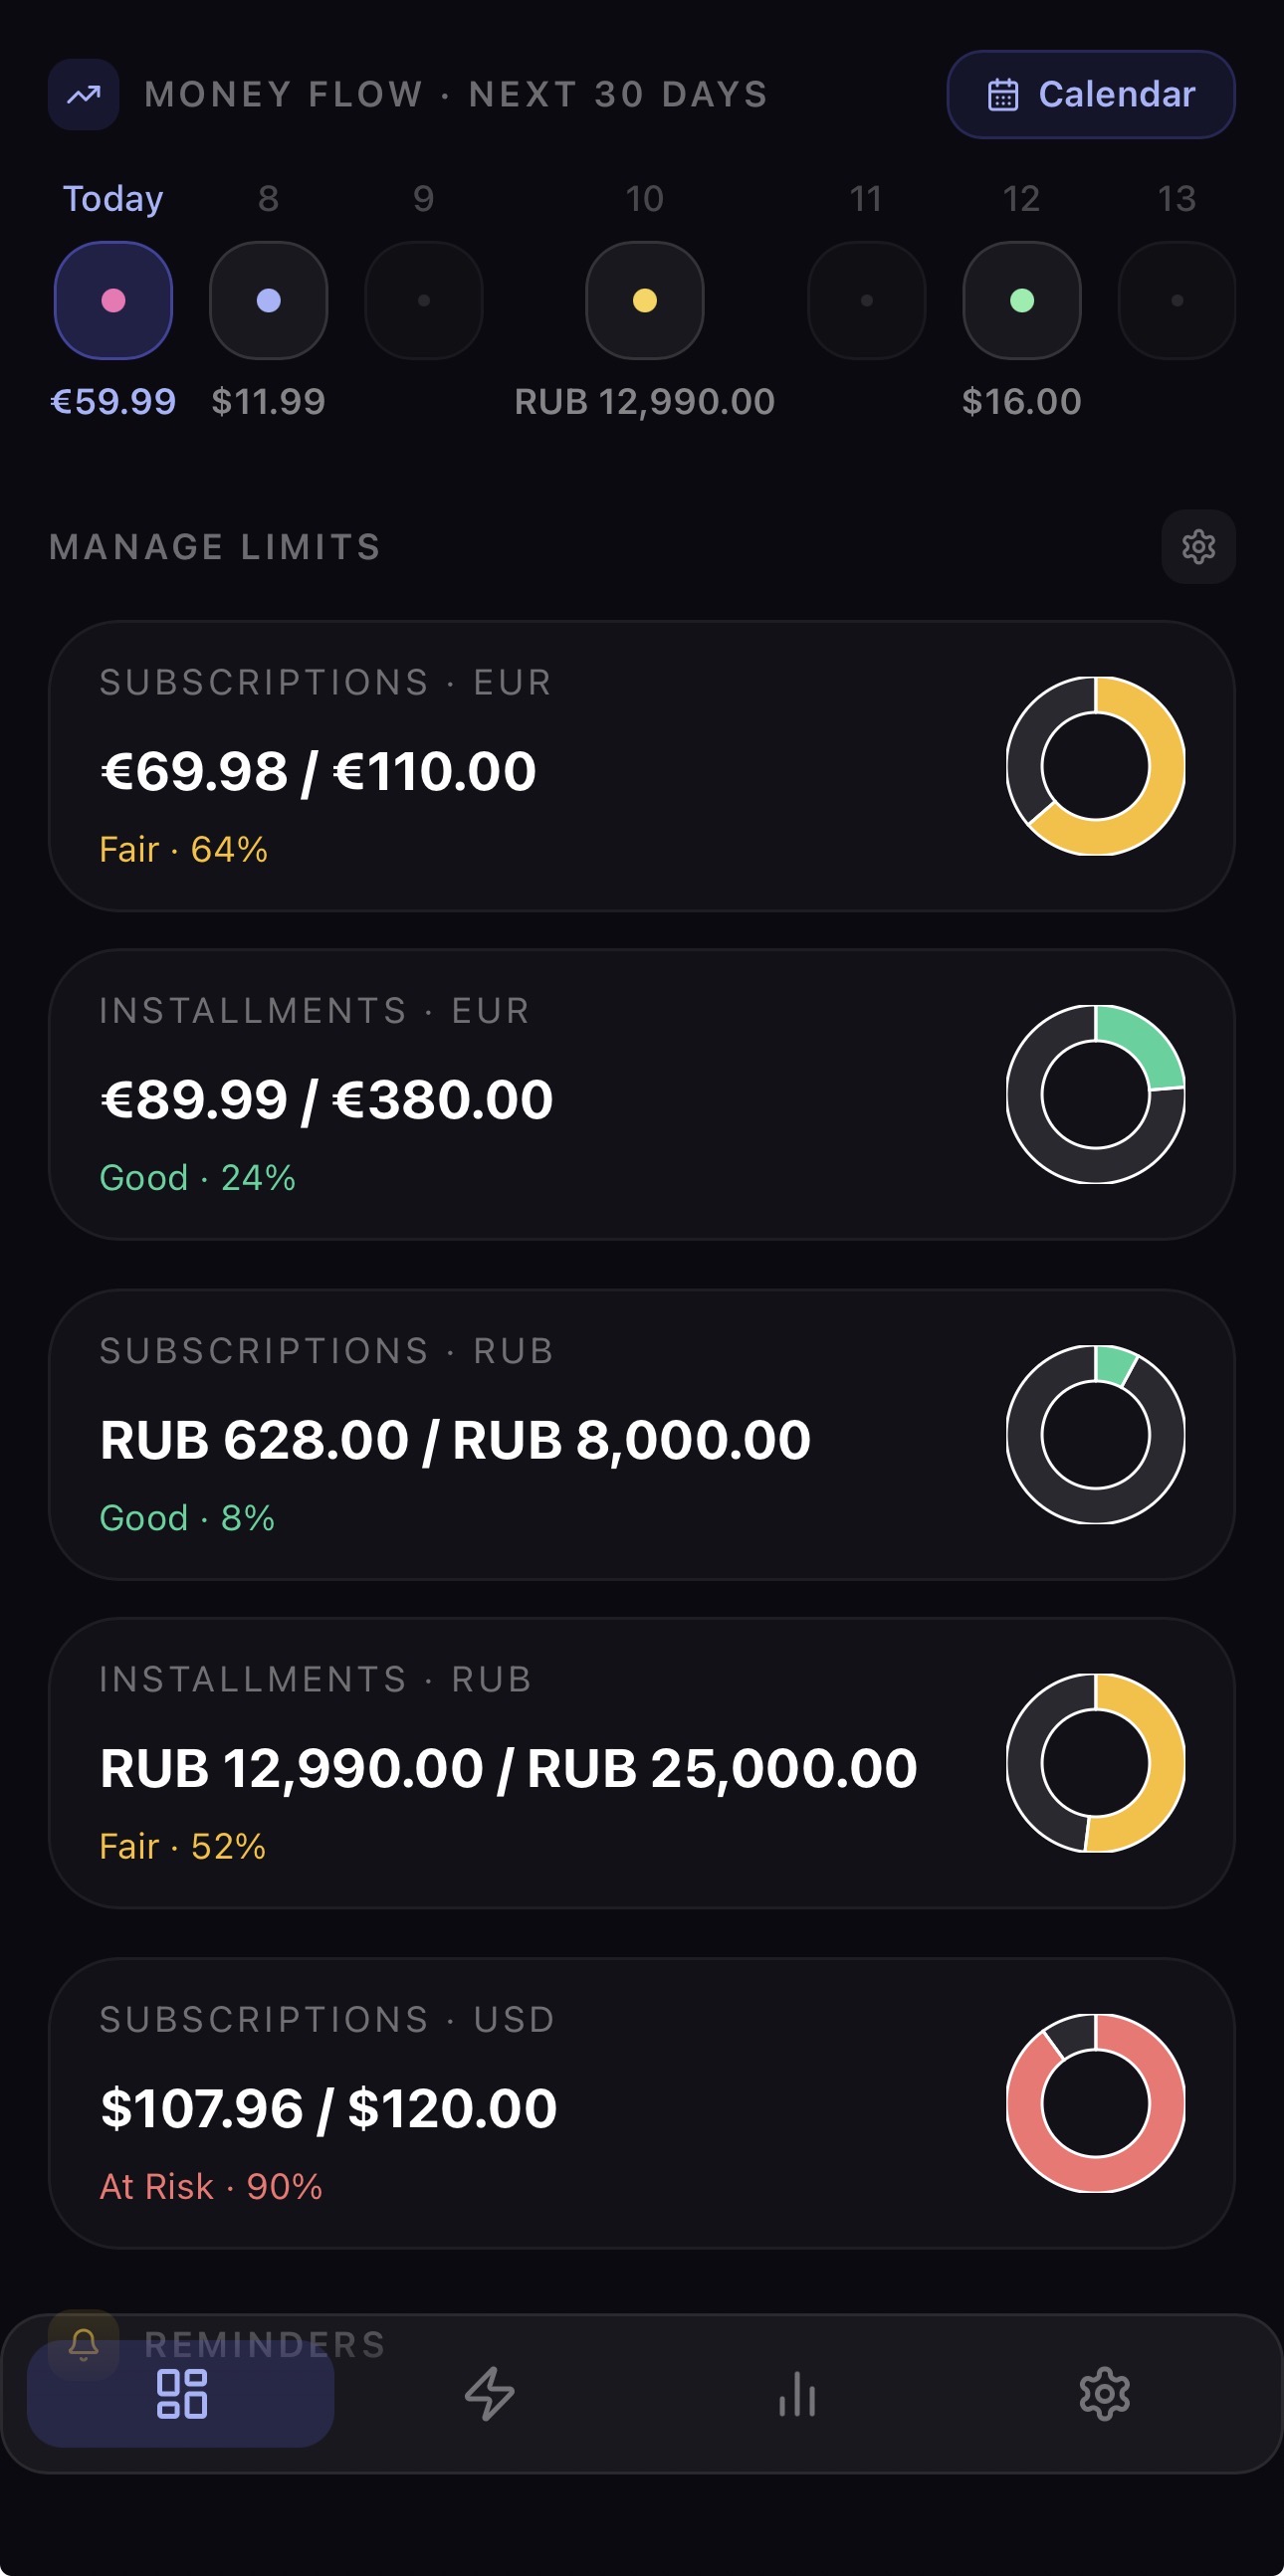
Shows monthly load by currency for subscriptions and installments. Limits are configurable per currency and turn yellow above 50% and red above 80%.
Shows due payments for today, tomorrow, and +2 days, plus overdue payments and services marked as unused.
A bar chart of daily outflows over the next 30 days. Spot heavy-spending days and plan your cash flow before the charges arrive.
Quick stats show monthly burn by currency, active obligations, payments due this week, and remaining installment balance.
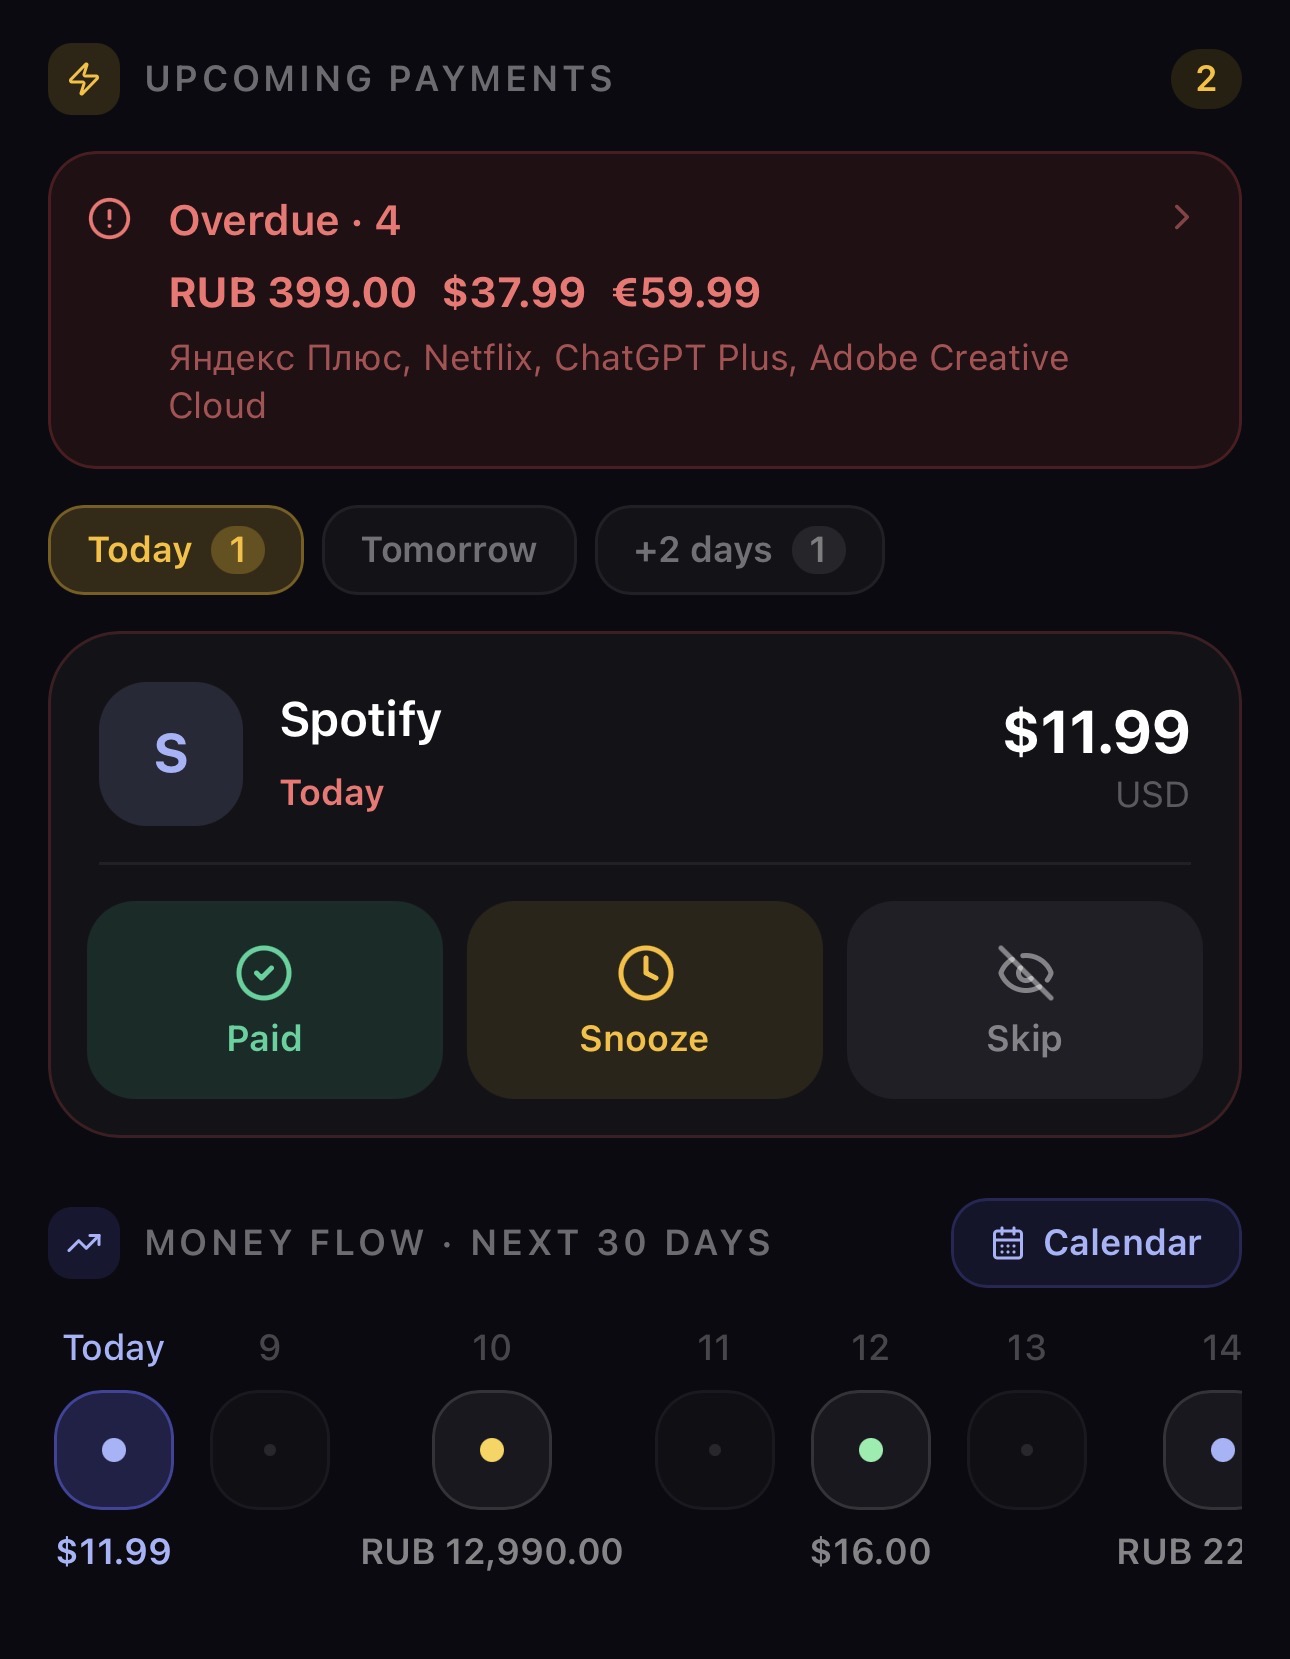 Upcoming payments
 Money flow timeline
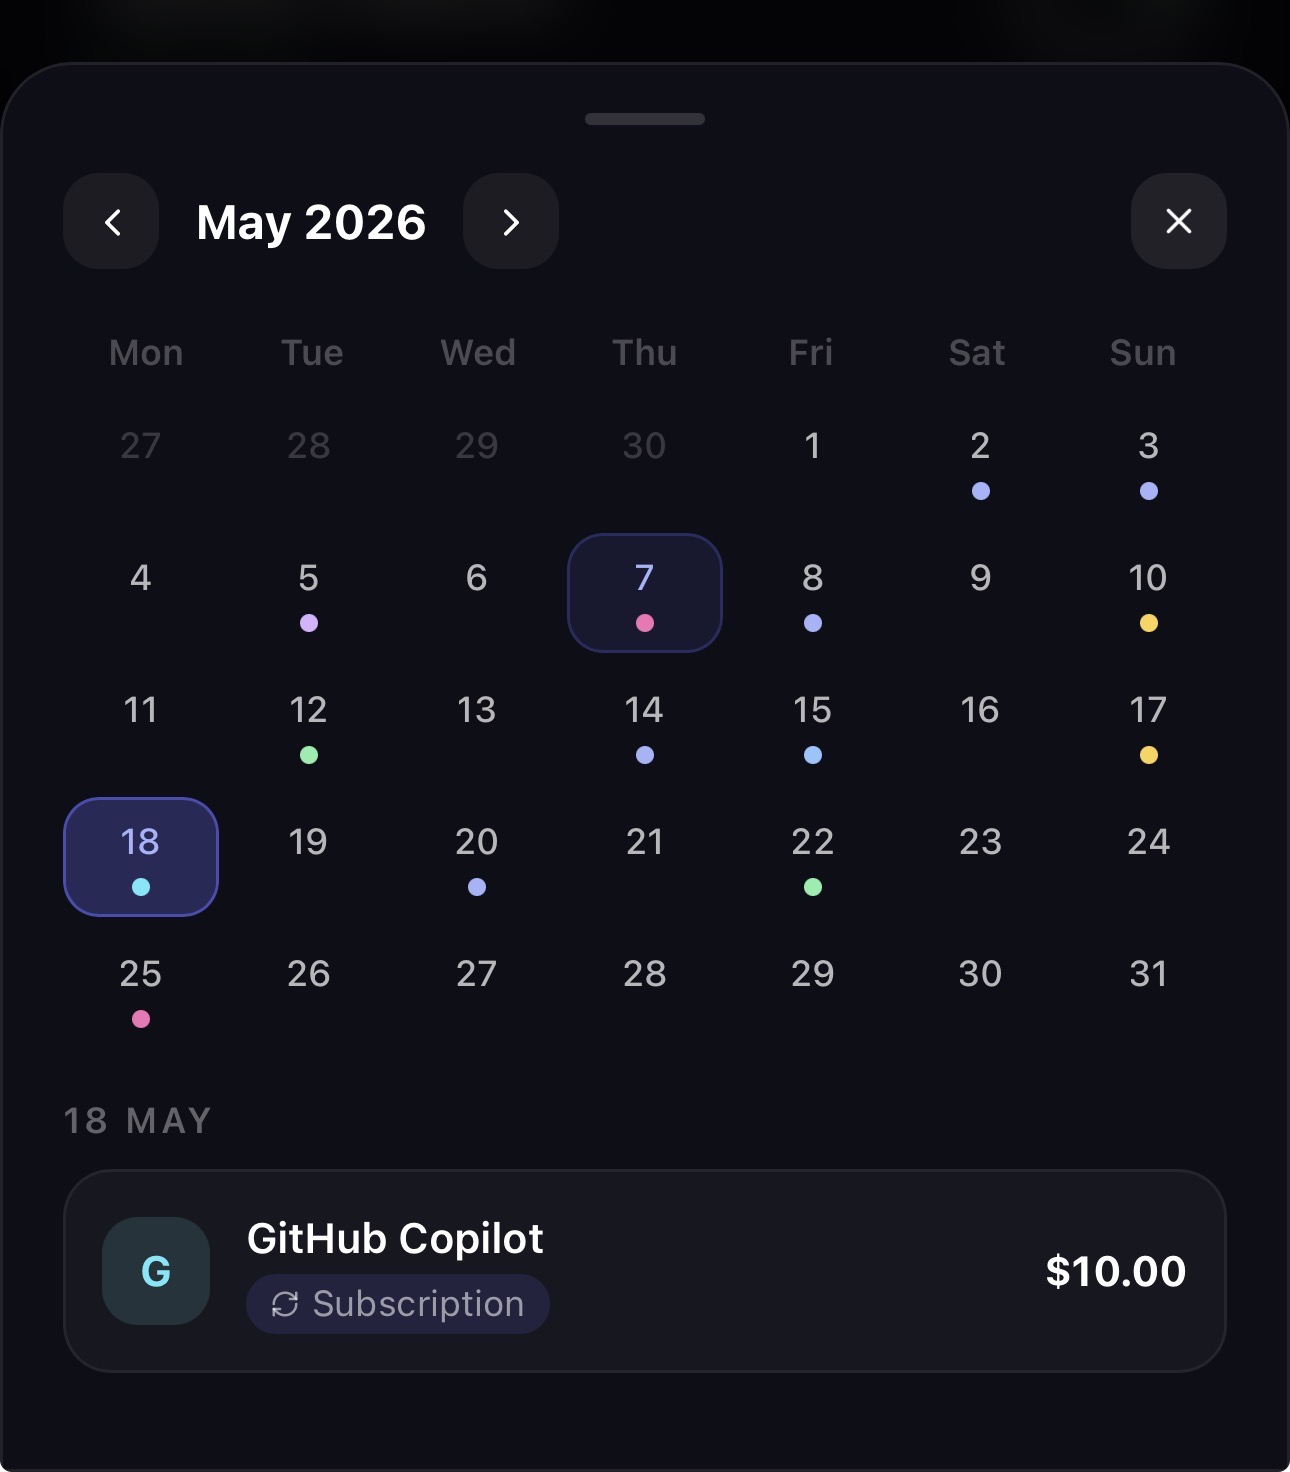 Calendar view
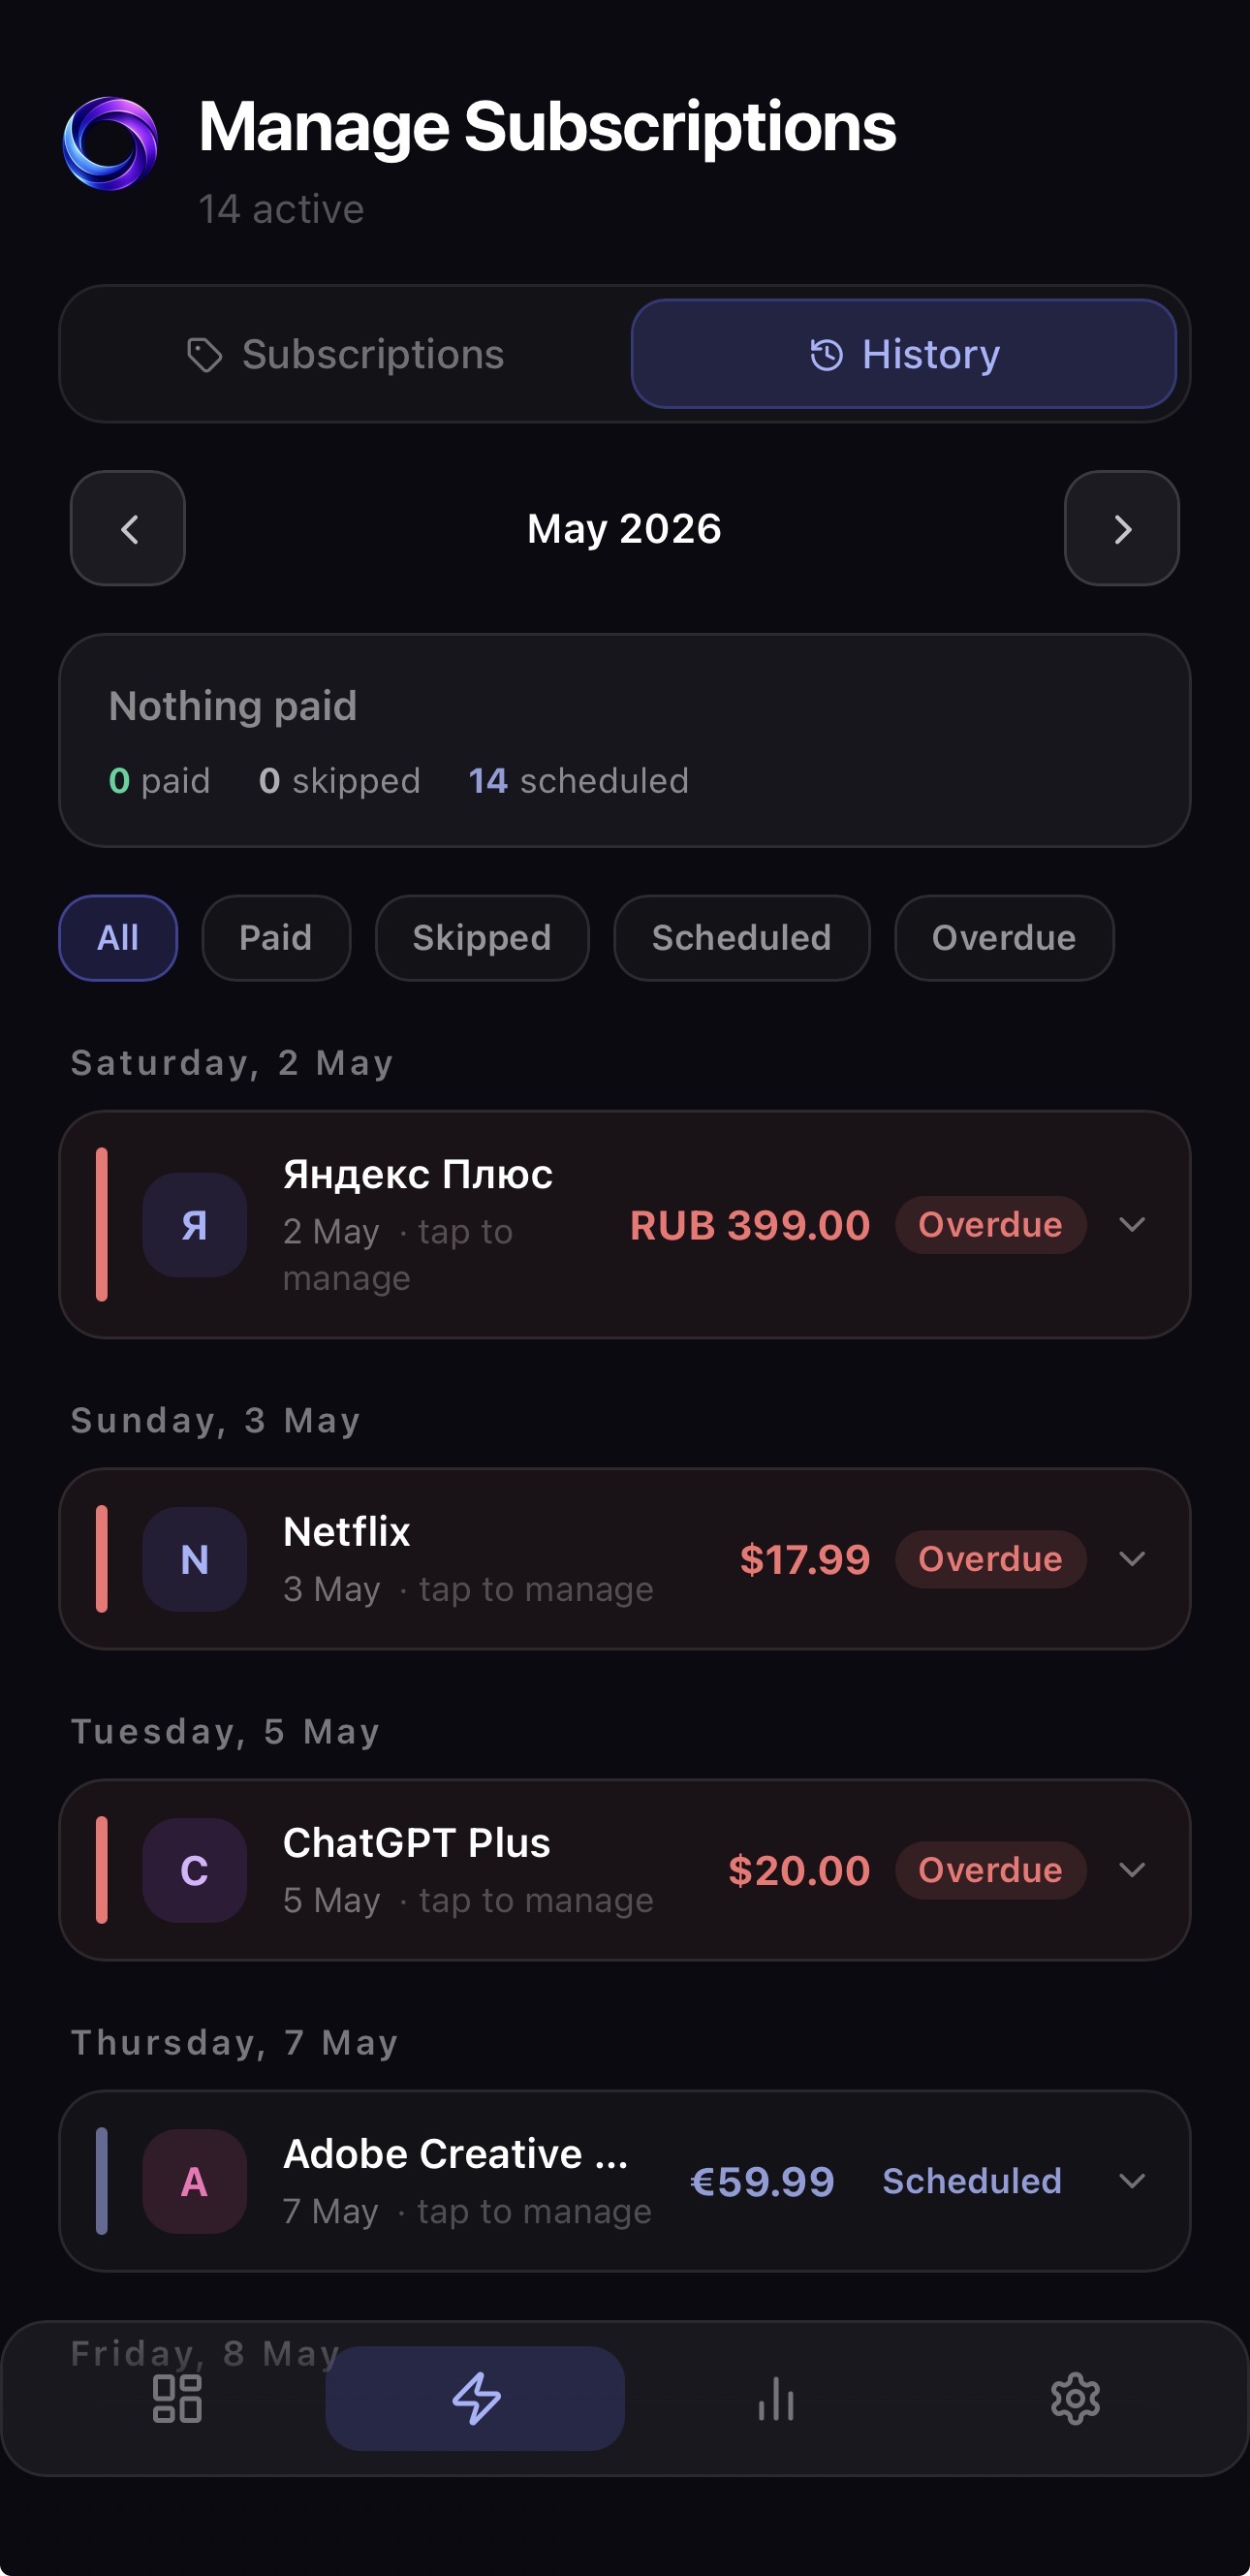
Use the action buttons on upcoming payments to mark paid, snooze, or skip. Open the obligation detail to change its payment source.
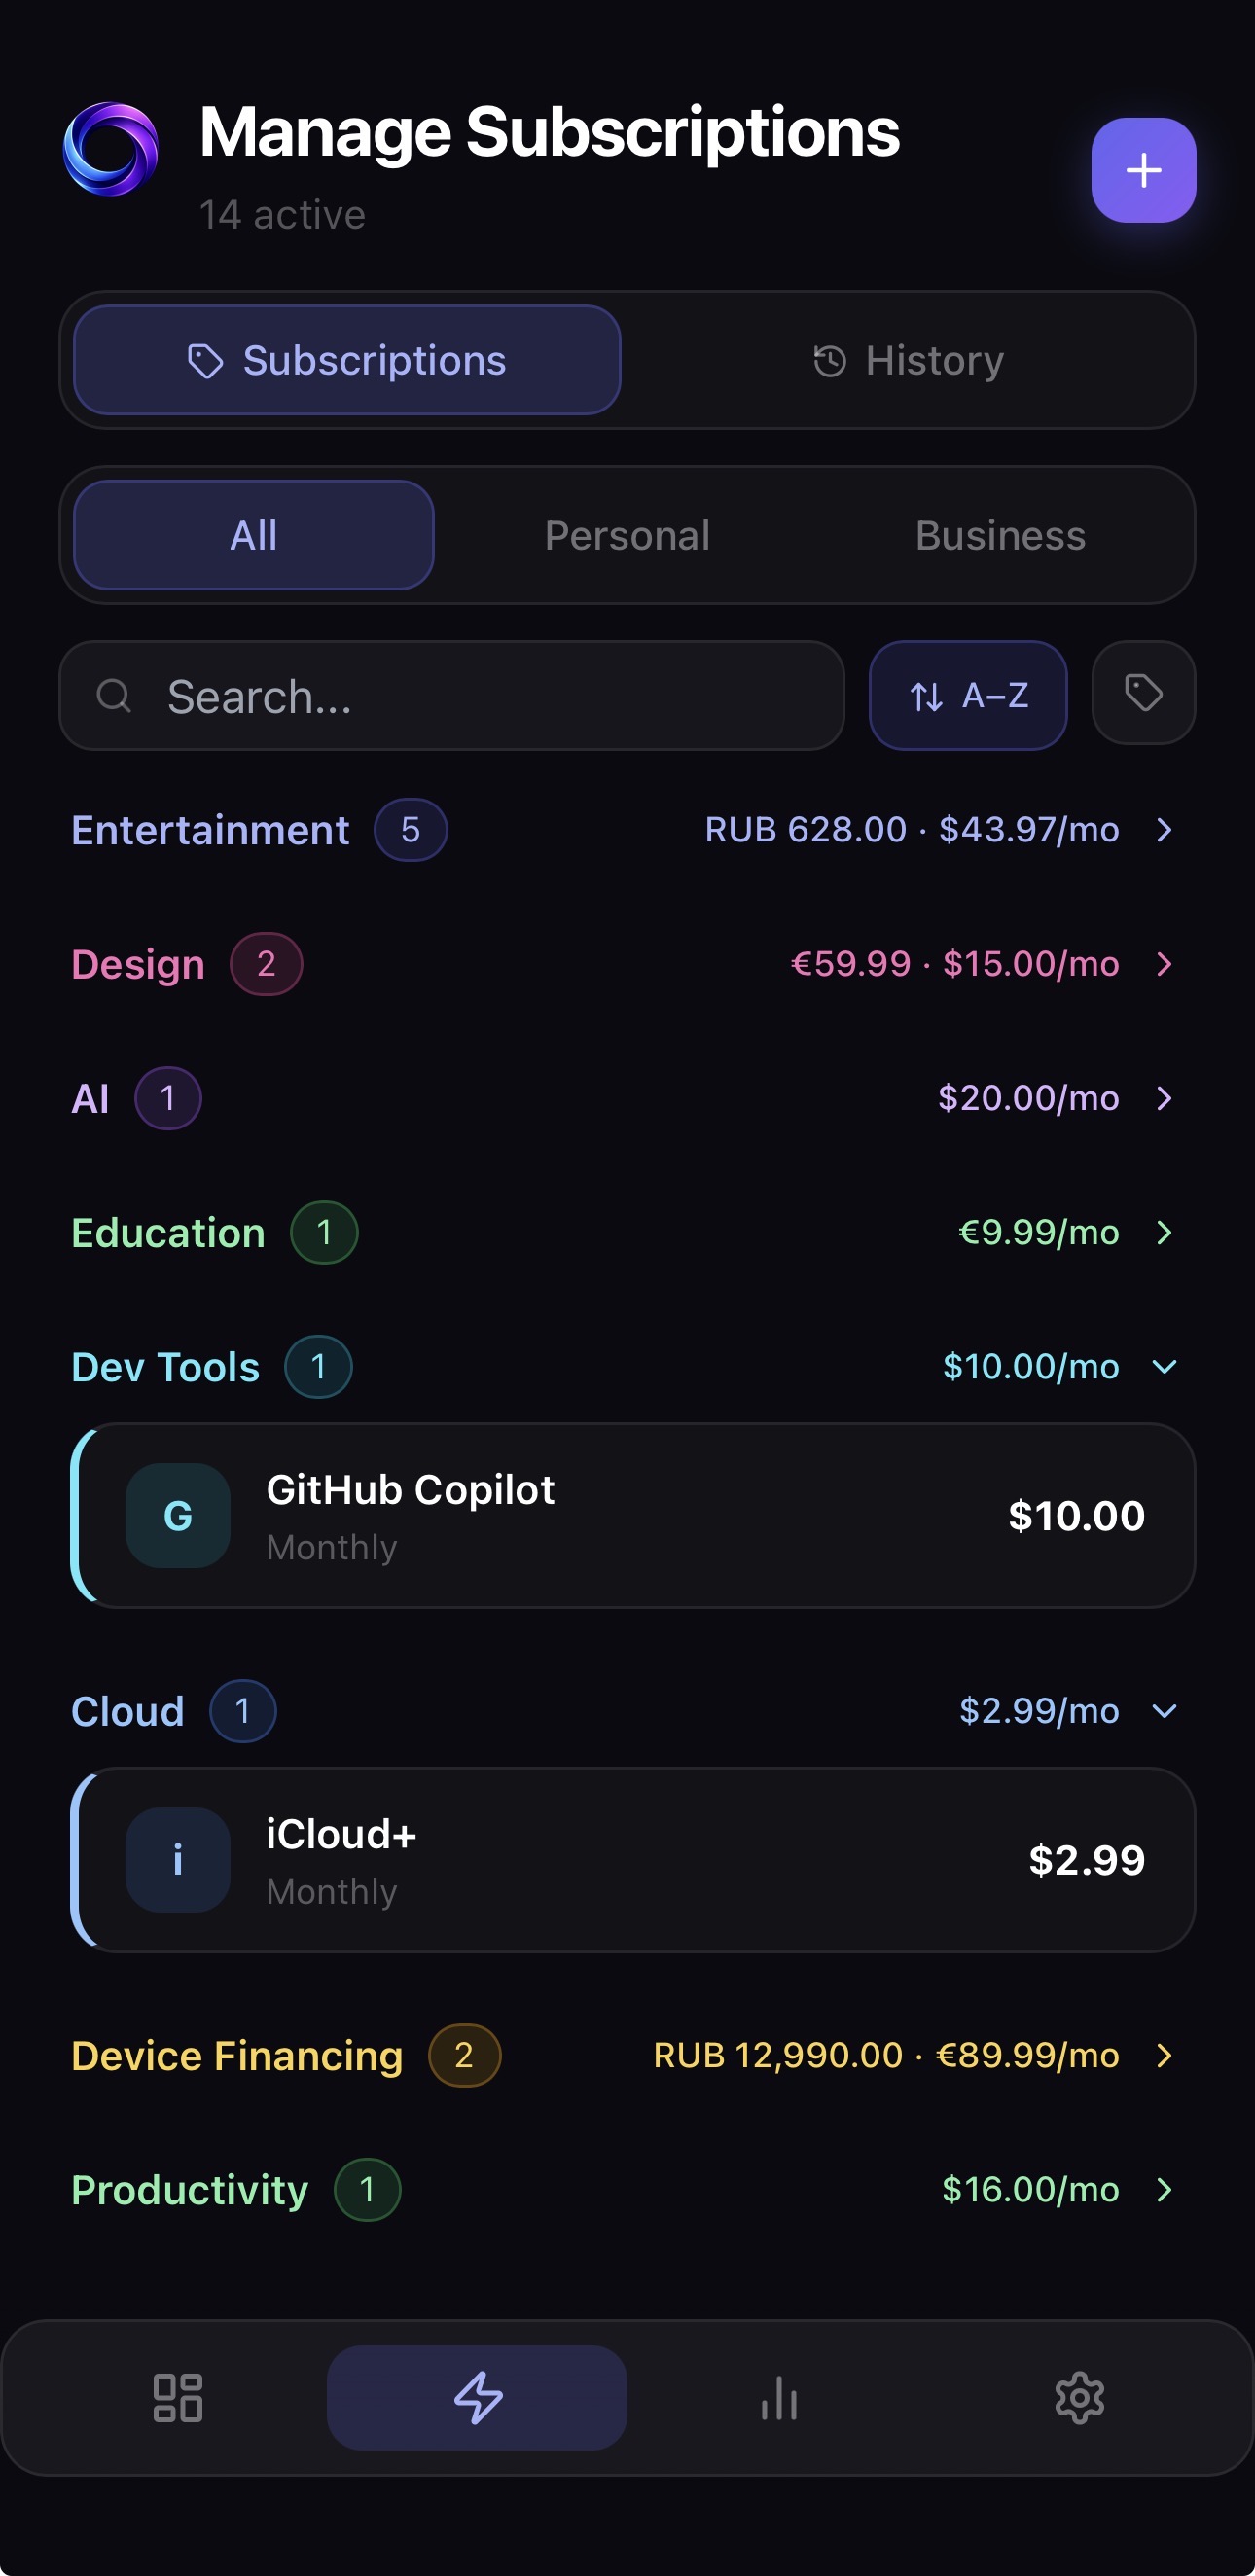
Track every obligation
Open Optimize and use the Subscriptions view to manage all recurring obligations. You can filter by Personal or Business, search by name, sort, group by category or status, and tap any item to see full details.
 Personal subscriptions
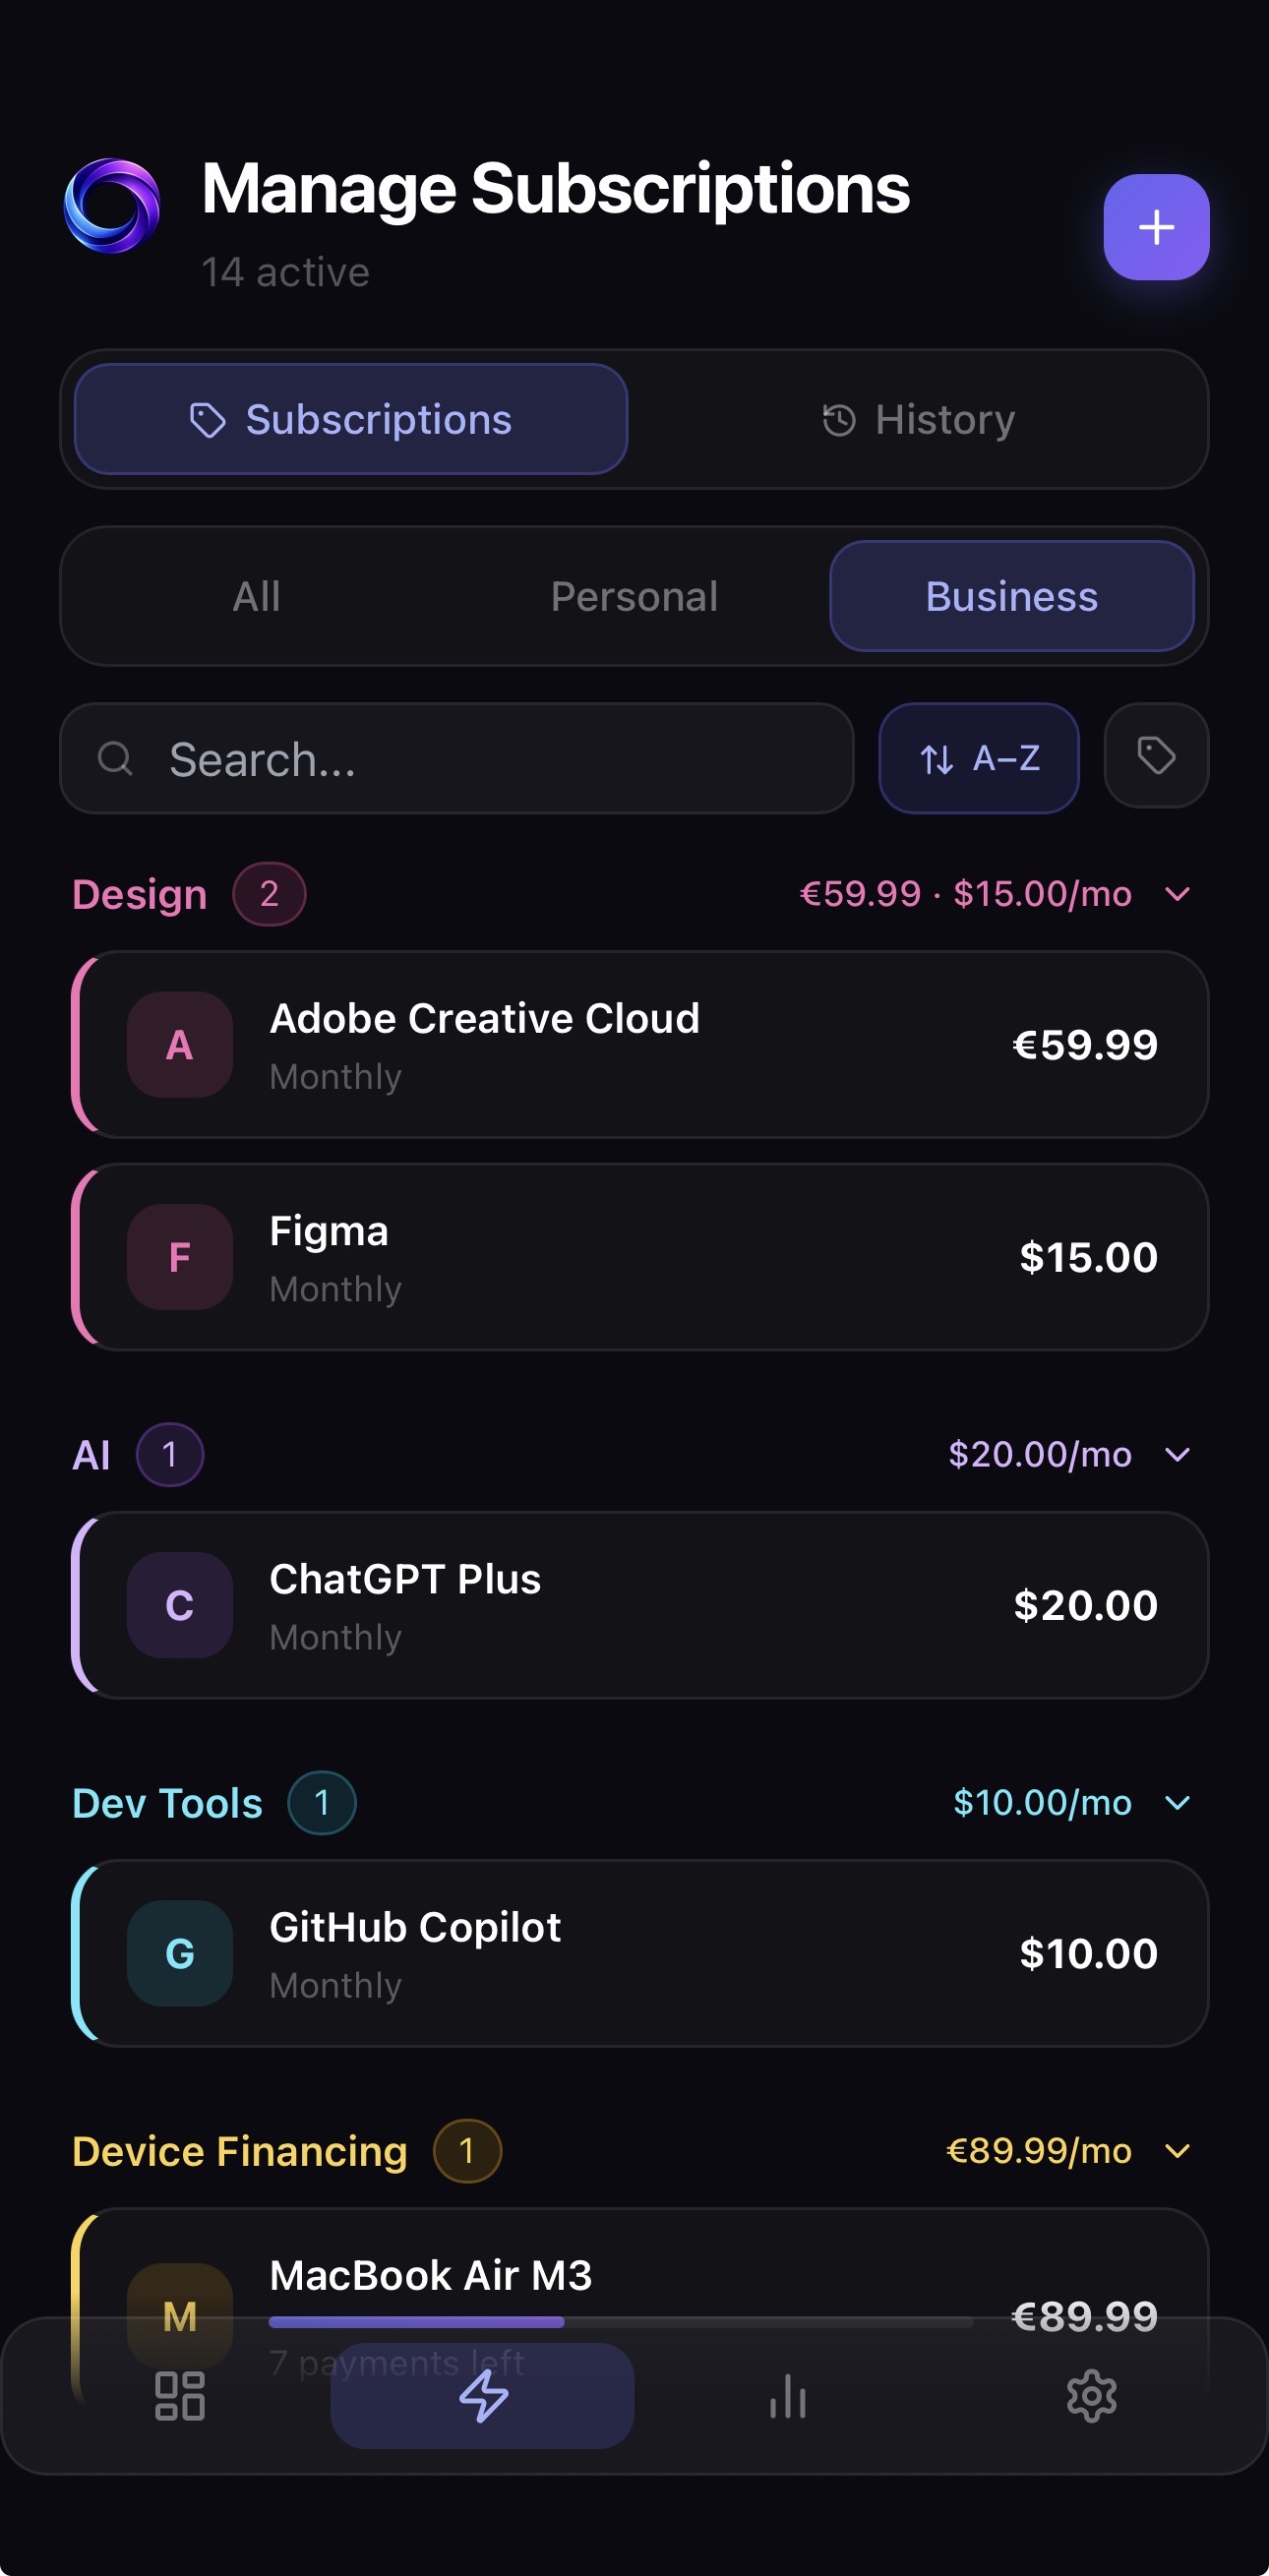 Business subscriptions
Obligation types
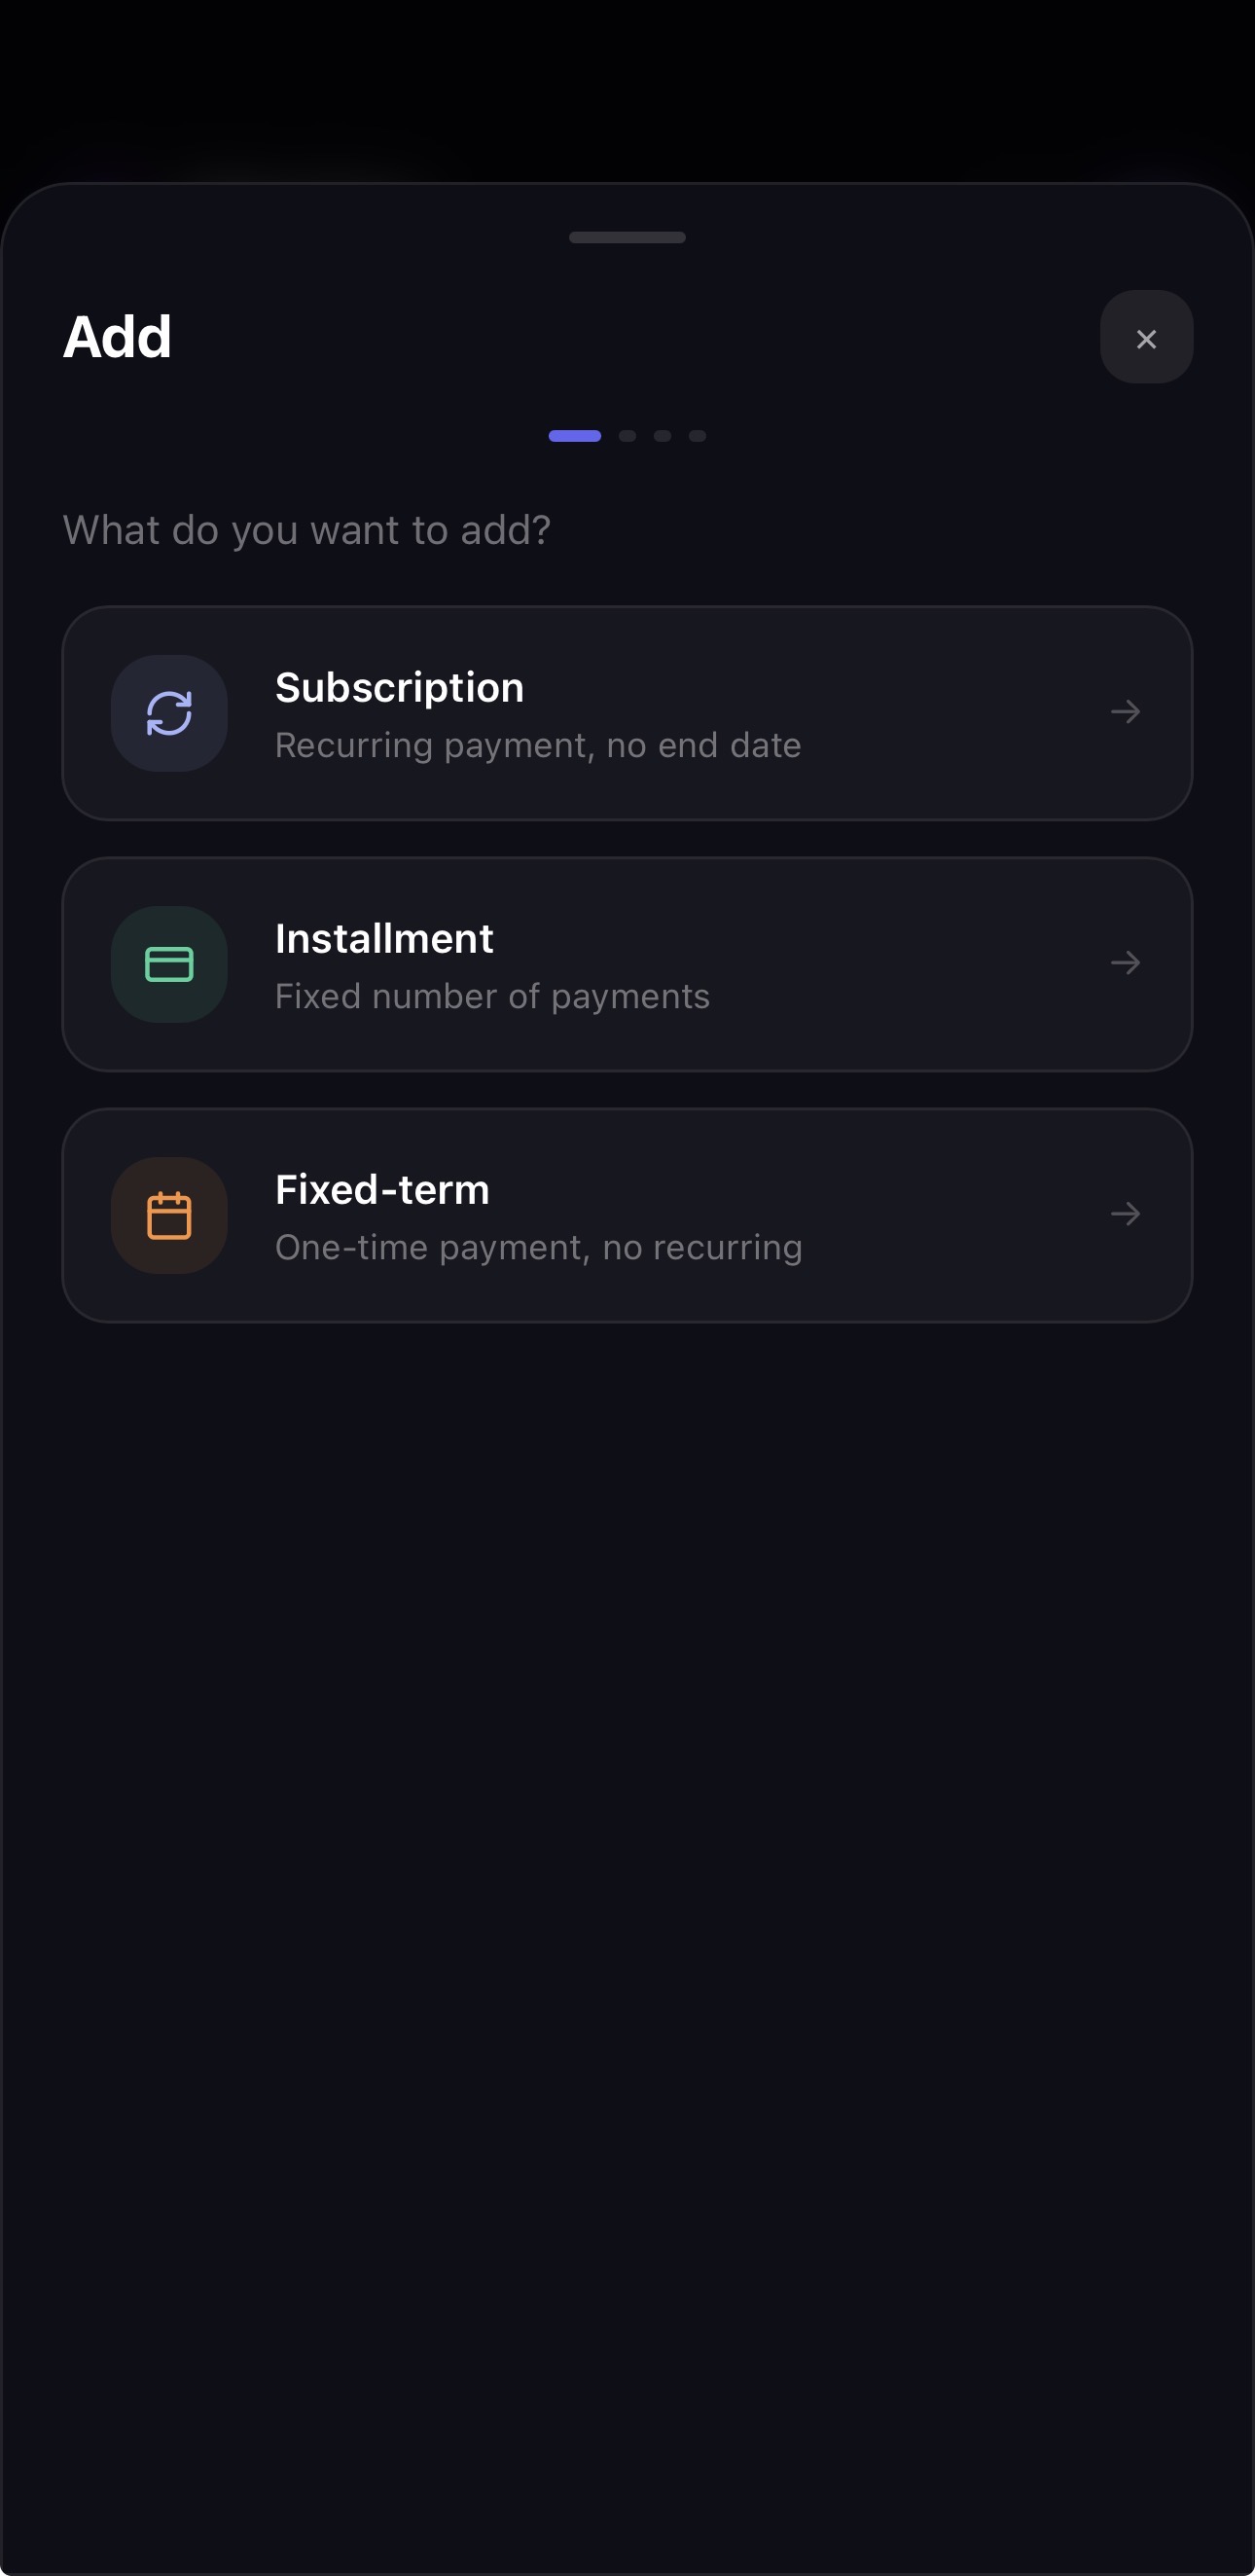
MONIQO's manual add flow supports three primary obligation types:
Recurring services billed on a fixed cycle — monthly, weekly, or annually. Netflix, Spotify, iCloud — all of these are subscriptions.
Fixed-count payment plans — for example, paying for a phone or software in 12 monthly installments. MONIQO tracks the remaining count and total paid.
A payment with a fixed due date or end date — useful for commitments that are not indefinite subscriptions.
If a service is not in the catalog, enter it manually. Custom billing intervals can be edited in the obligation details when needed.
Subscription detail
Tap any subscription to see and edit all its properties — amount, billing cycle, payment source, notes, and reminder settings.
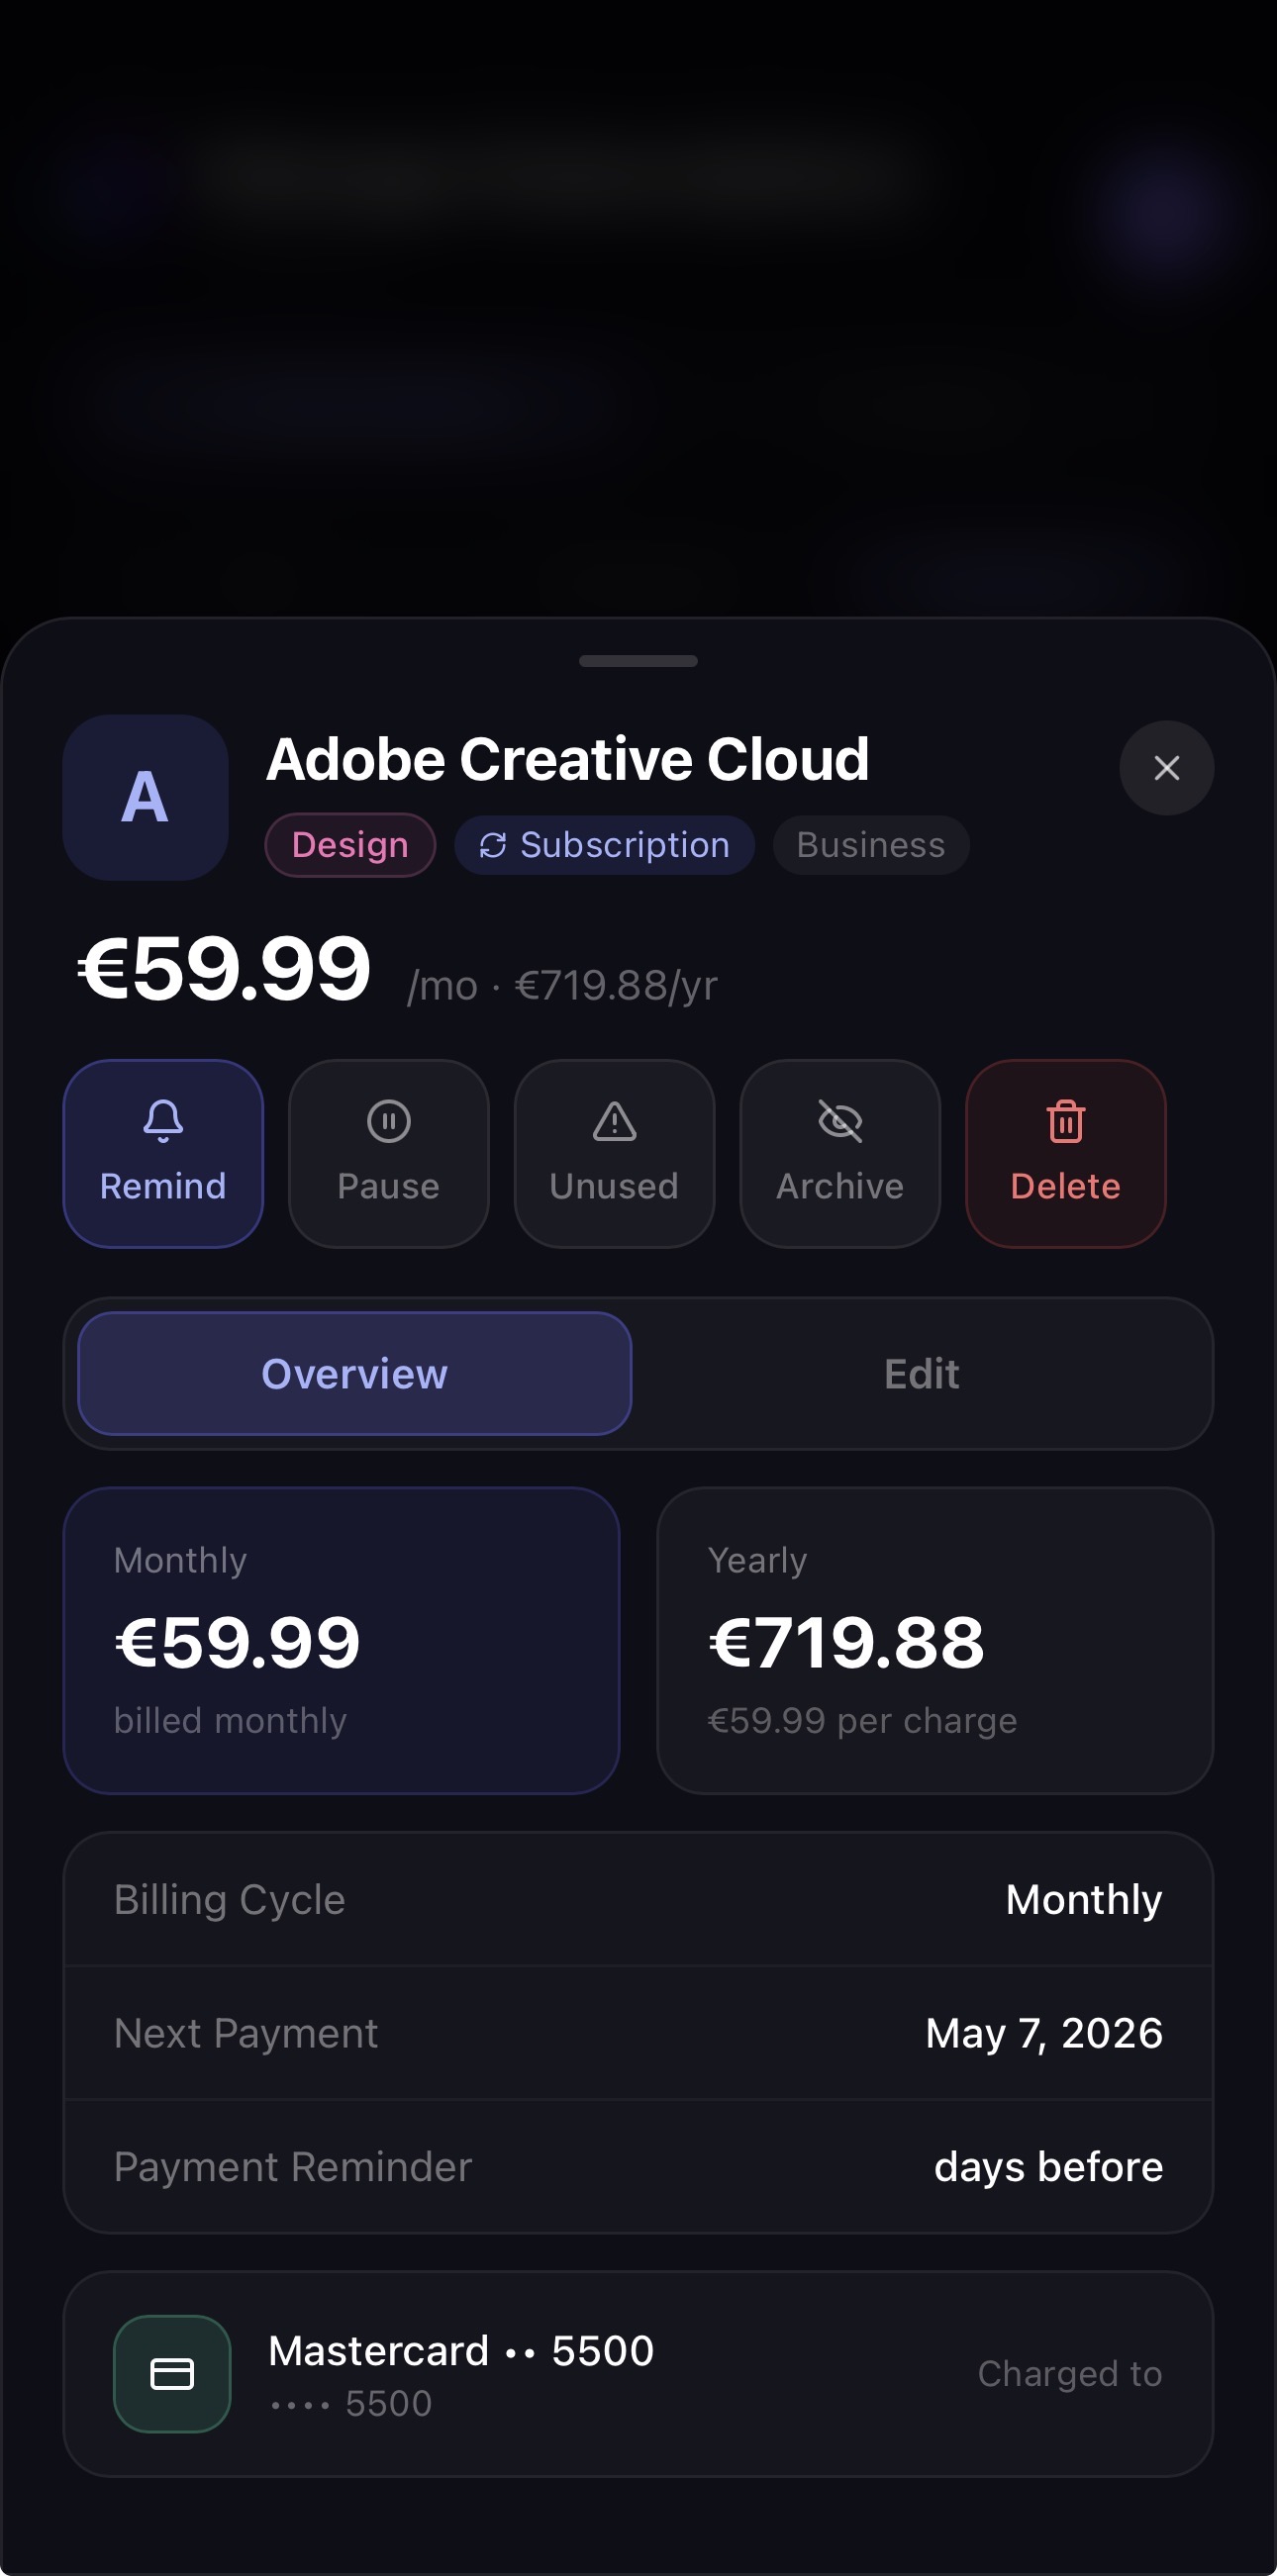 Subscription detail view
 Edit any field inline
Adding a subscription manually
Tap the + button on Dashboard or in Optimize → Subscriptions to add a new obligation. You can pick from the 790+ service catalog or enter a custom service.
Select Subscription, Installment, or Fixed-term. The form adapts to show the right fields for each type.
Type the service name. If it's in the catalog, details autofill — logo, default amount, and billing cycle. Otherwise, fill in manually.
Enter the actual amount you pay, the next charge date, and which payment source it uses. Tap Save to add it to your list.
Understand your spending
The Analytics tab breaks down your subscription spending by category, currency, and personal vs. business scope. Use it to find where your budget is going and spot savings opportunities.
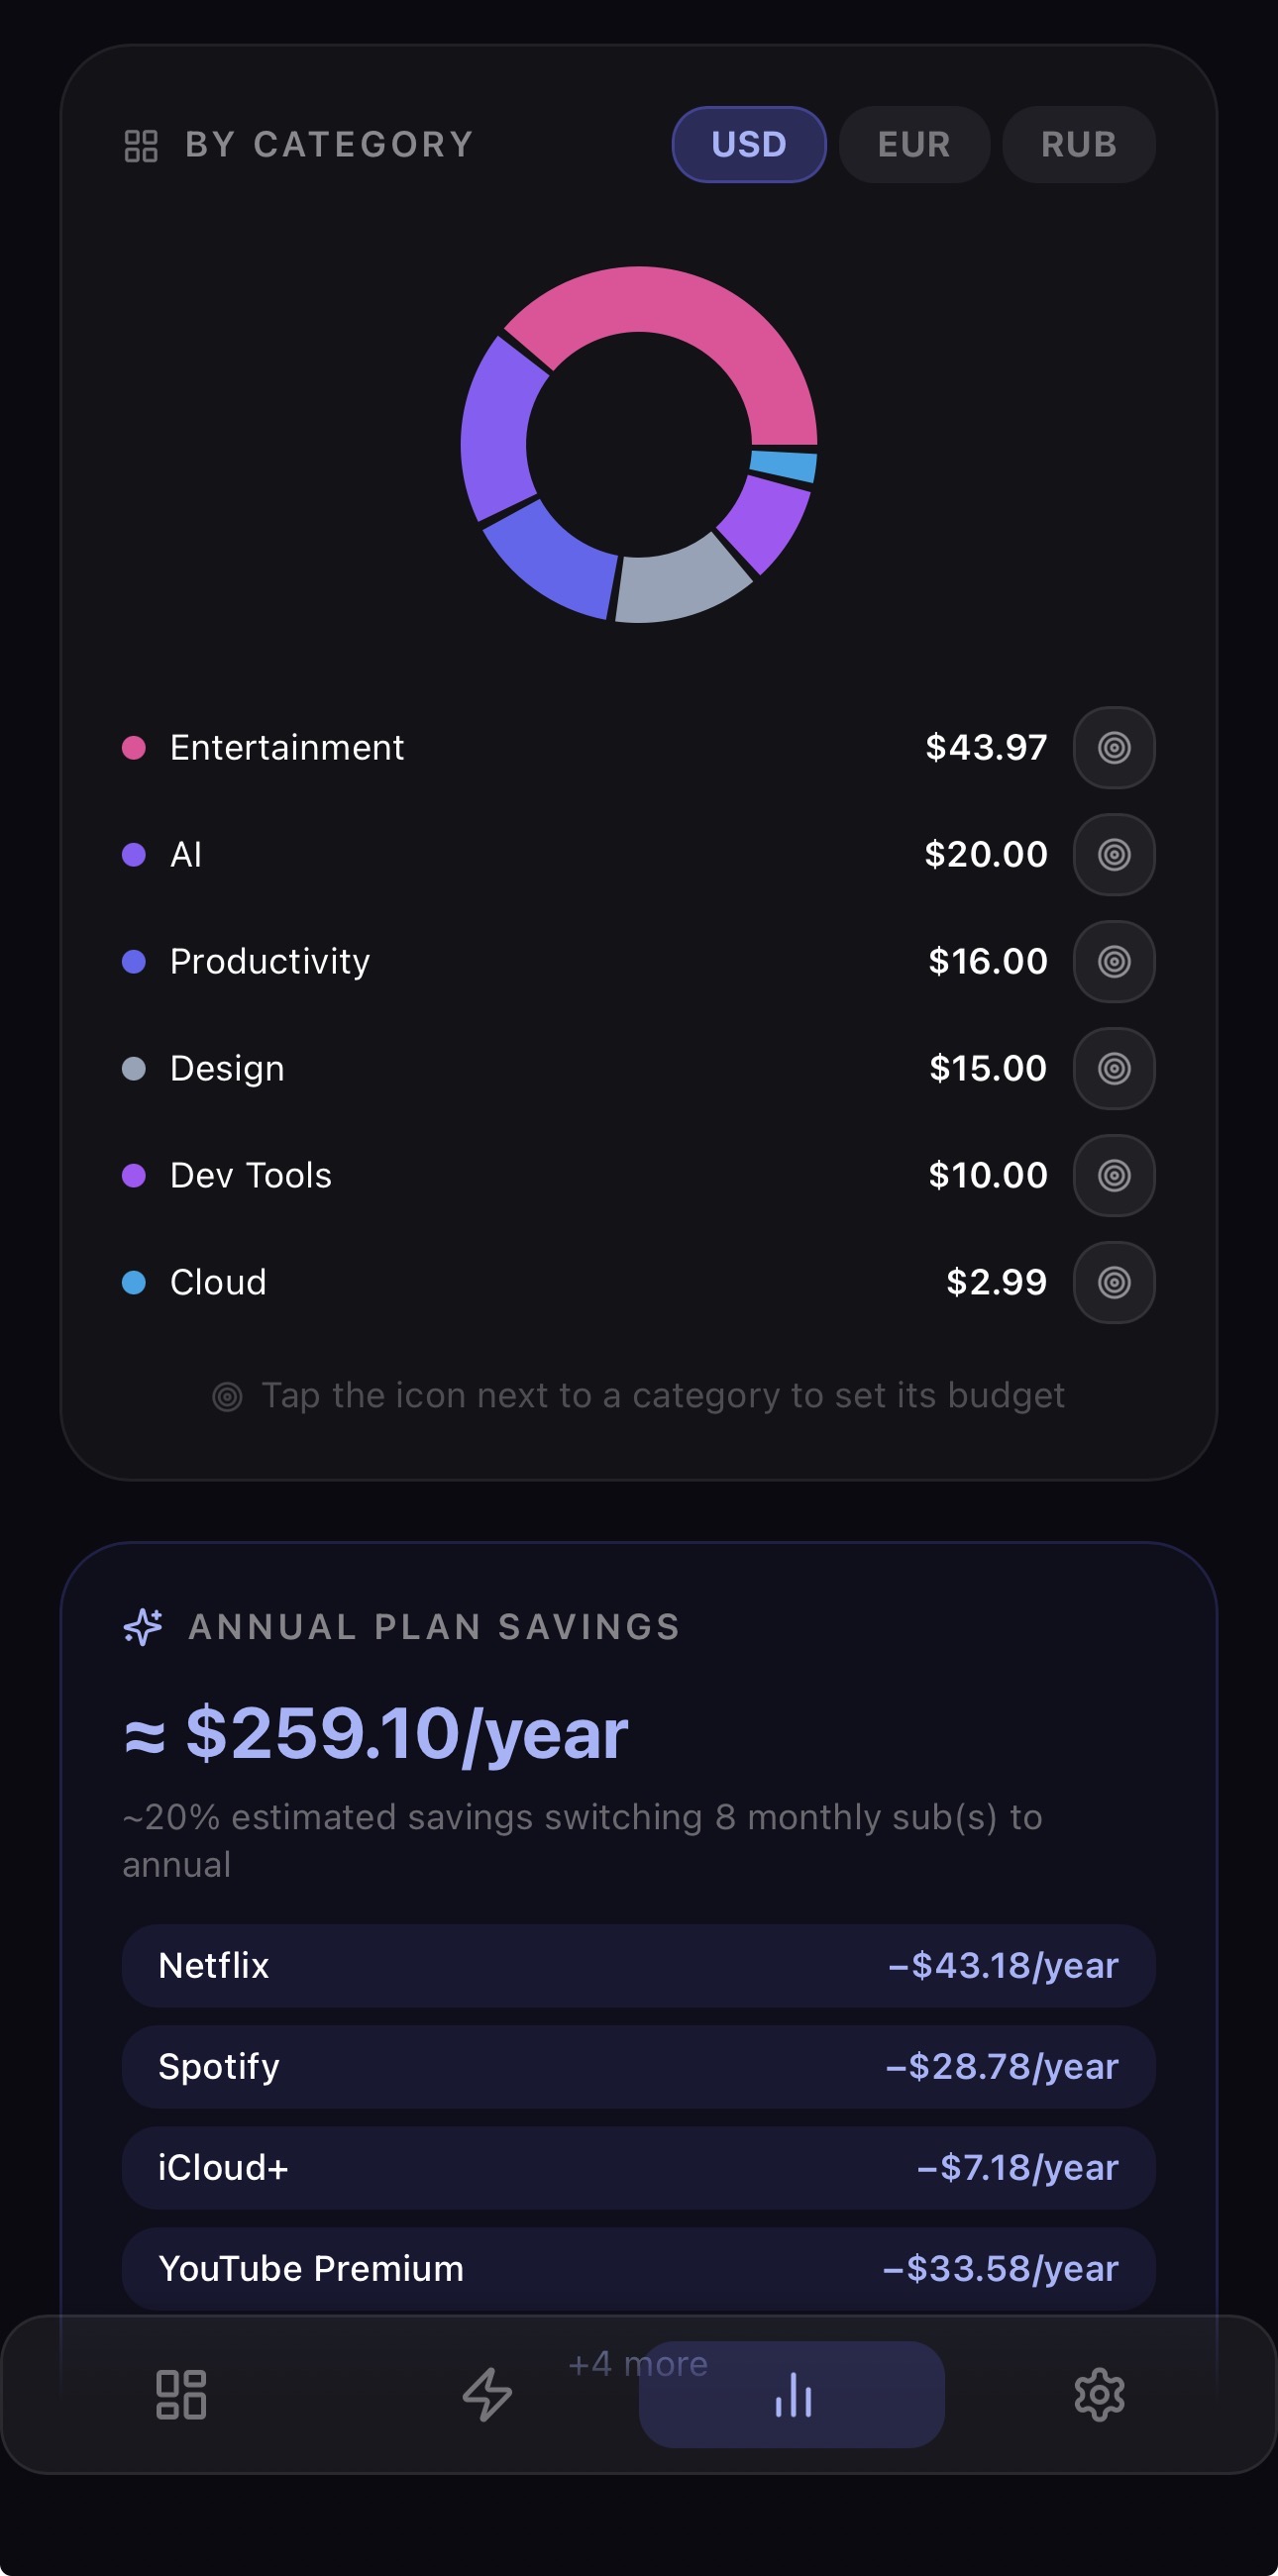 Spending by category
 Monthly trends
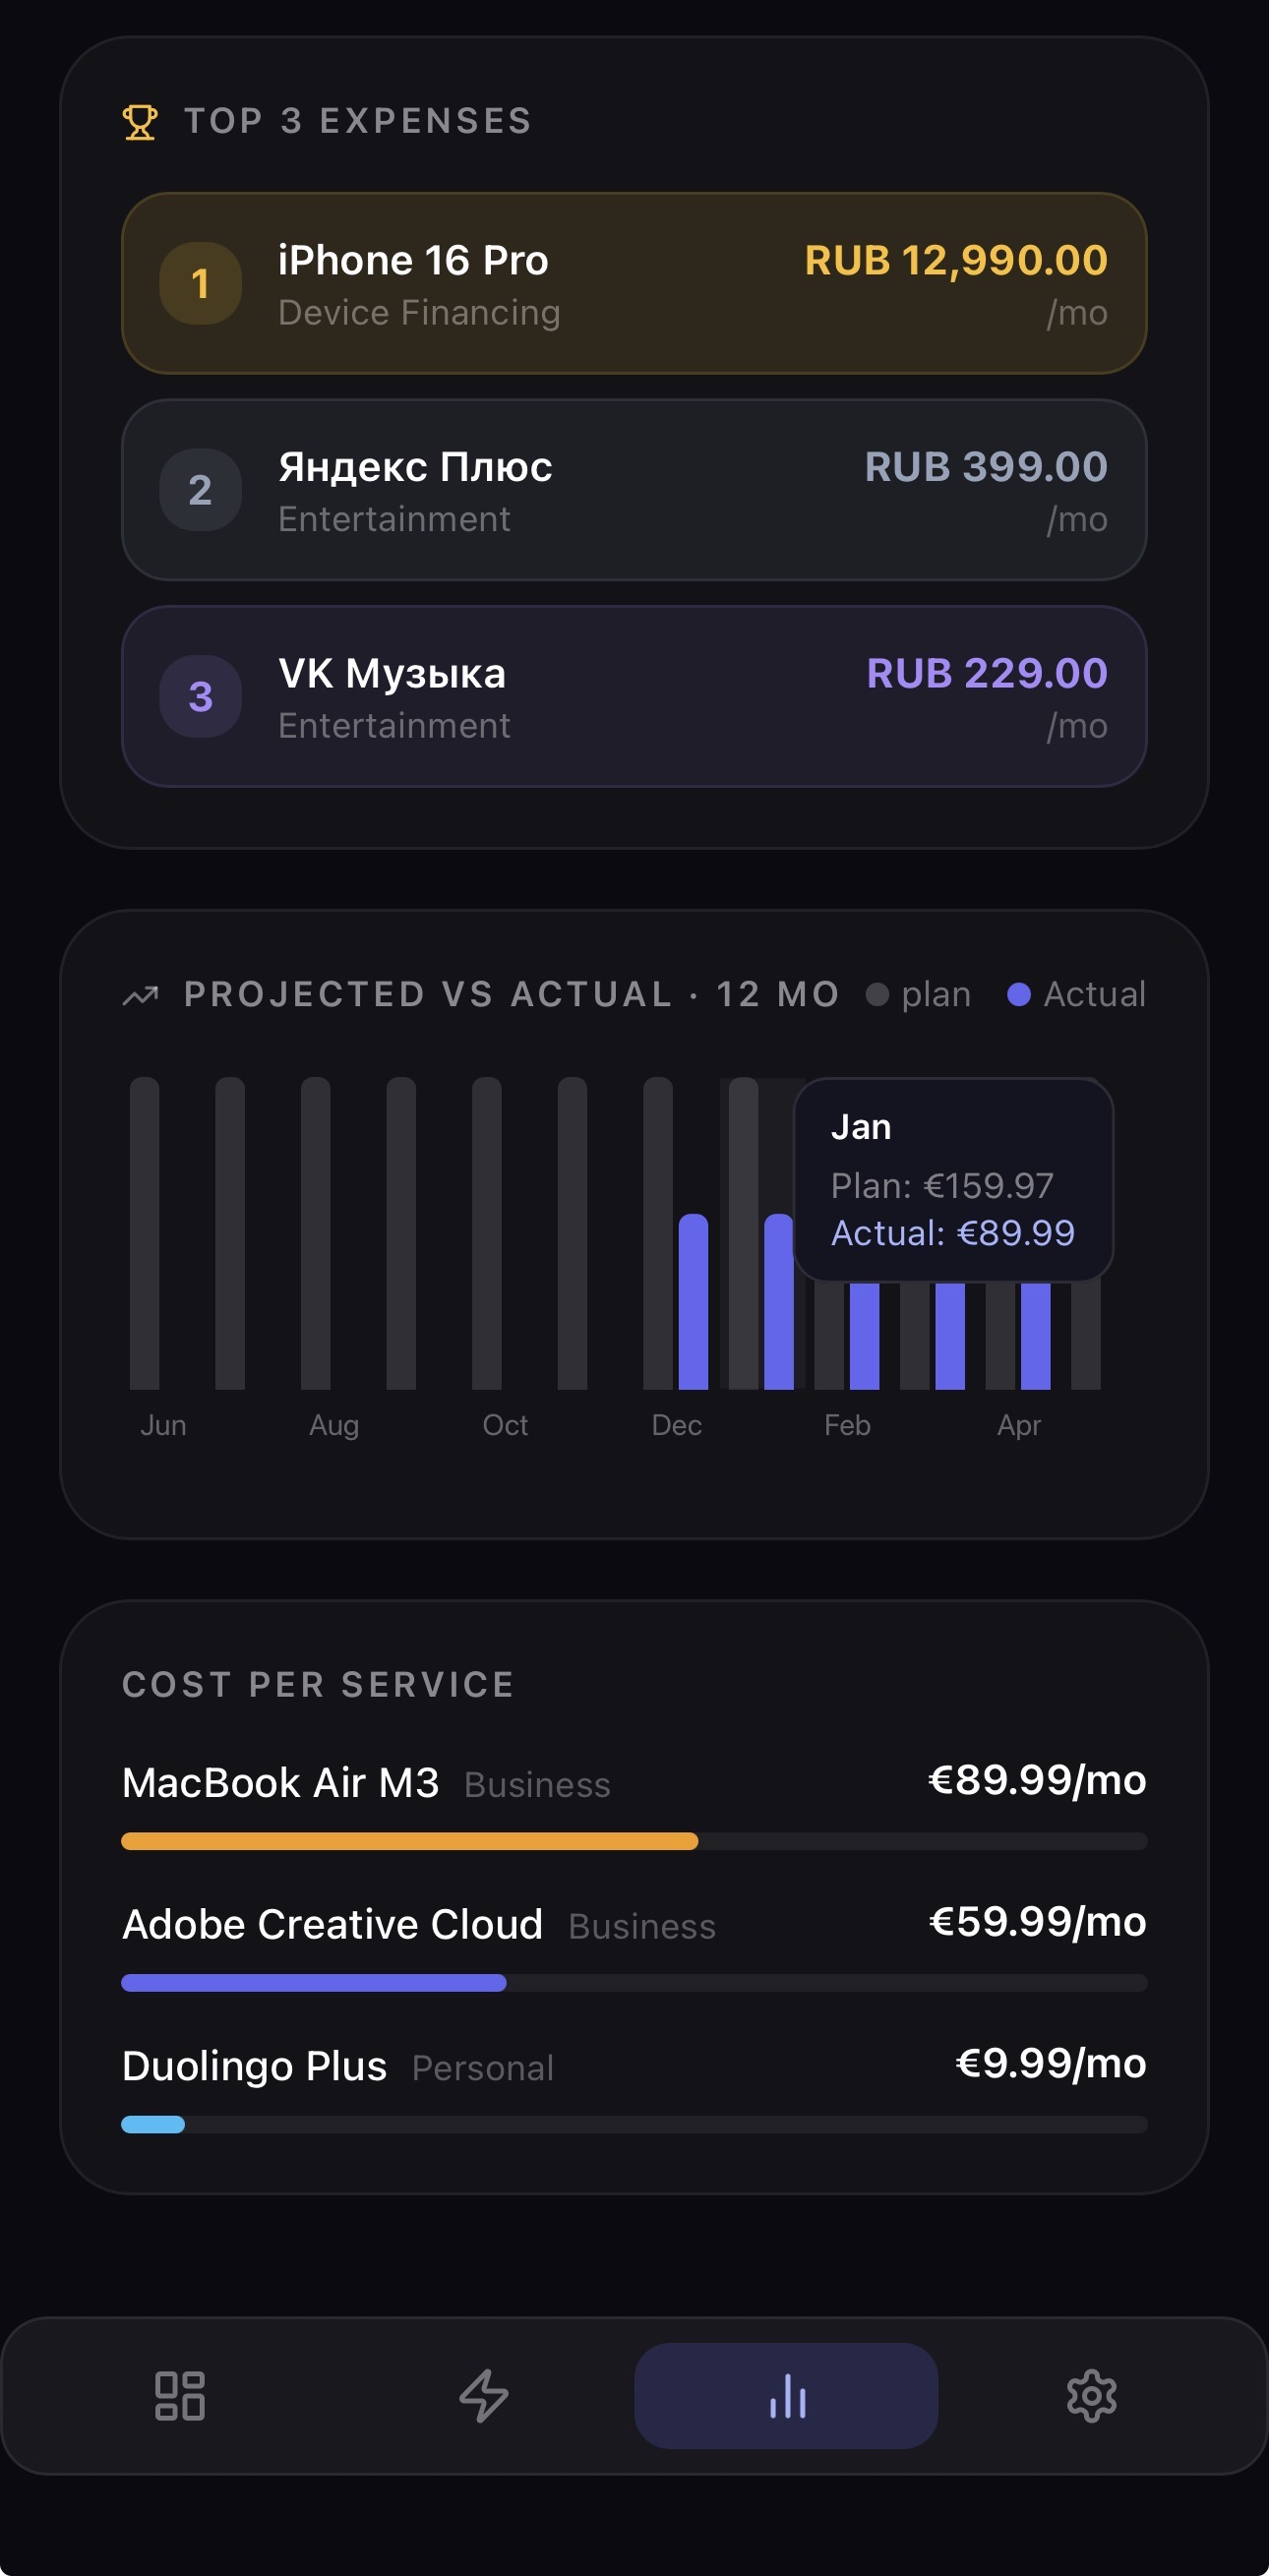 Top 3 expenses
See how much you spend per category — Video, Music, Cloud, AI, etc. A pie chart shows the proportion at a glance.
Compare spending month-over-month. See if you're adding more services, cutting back, or if costs are creeping up on annual renewals.
Your three most expensive services, ranked. A quick way to identify which subscriptions have the biggest impact on your budget.
Split spending by scope — see total personal and business obligations separately. Useful for expense reporting and budget planning.
Map services to cards
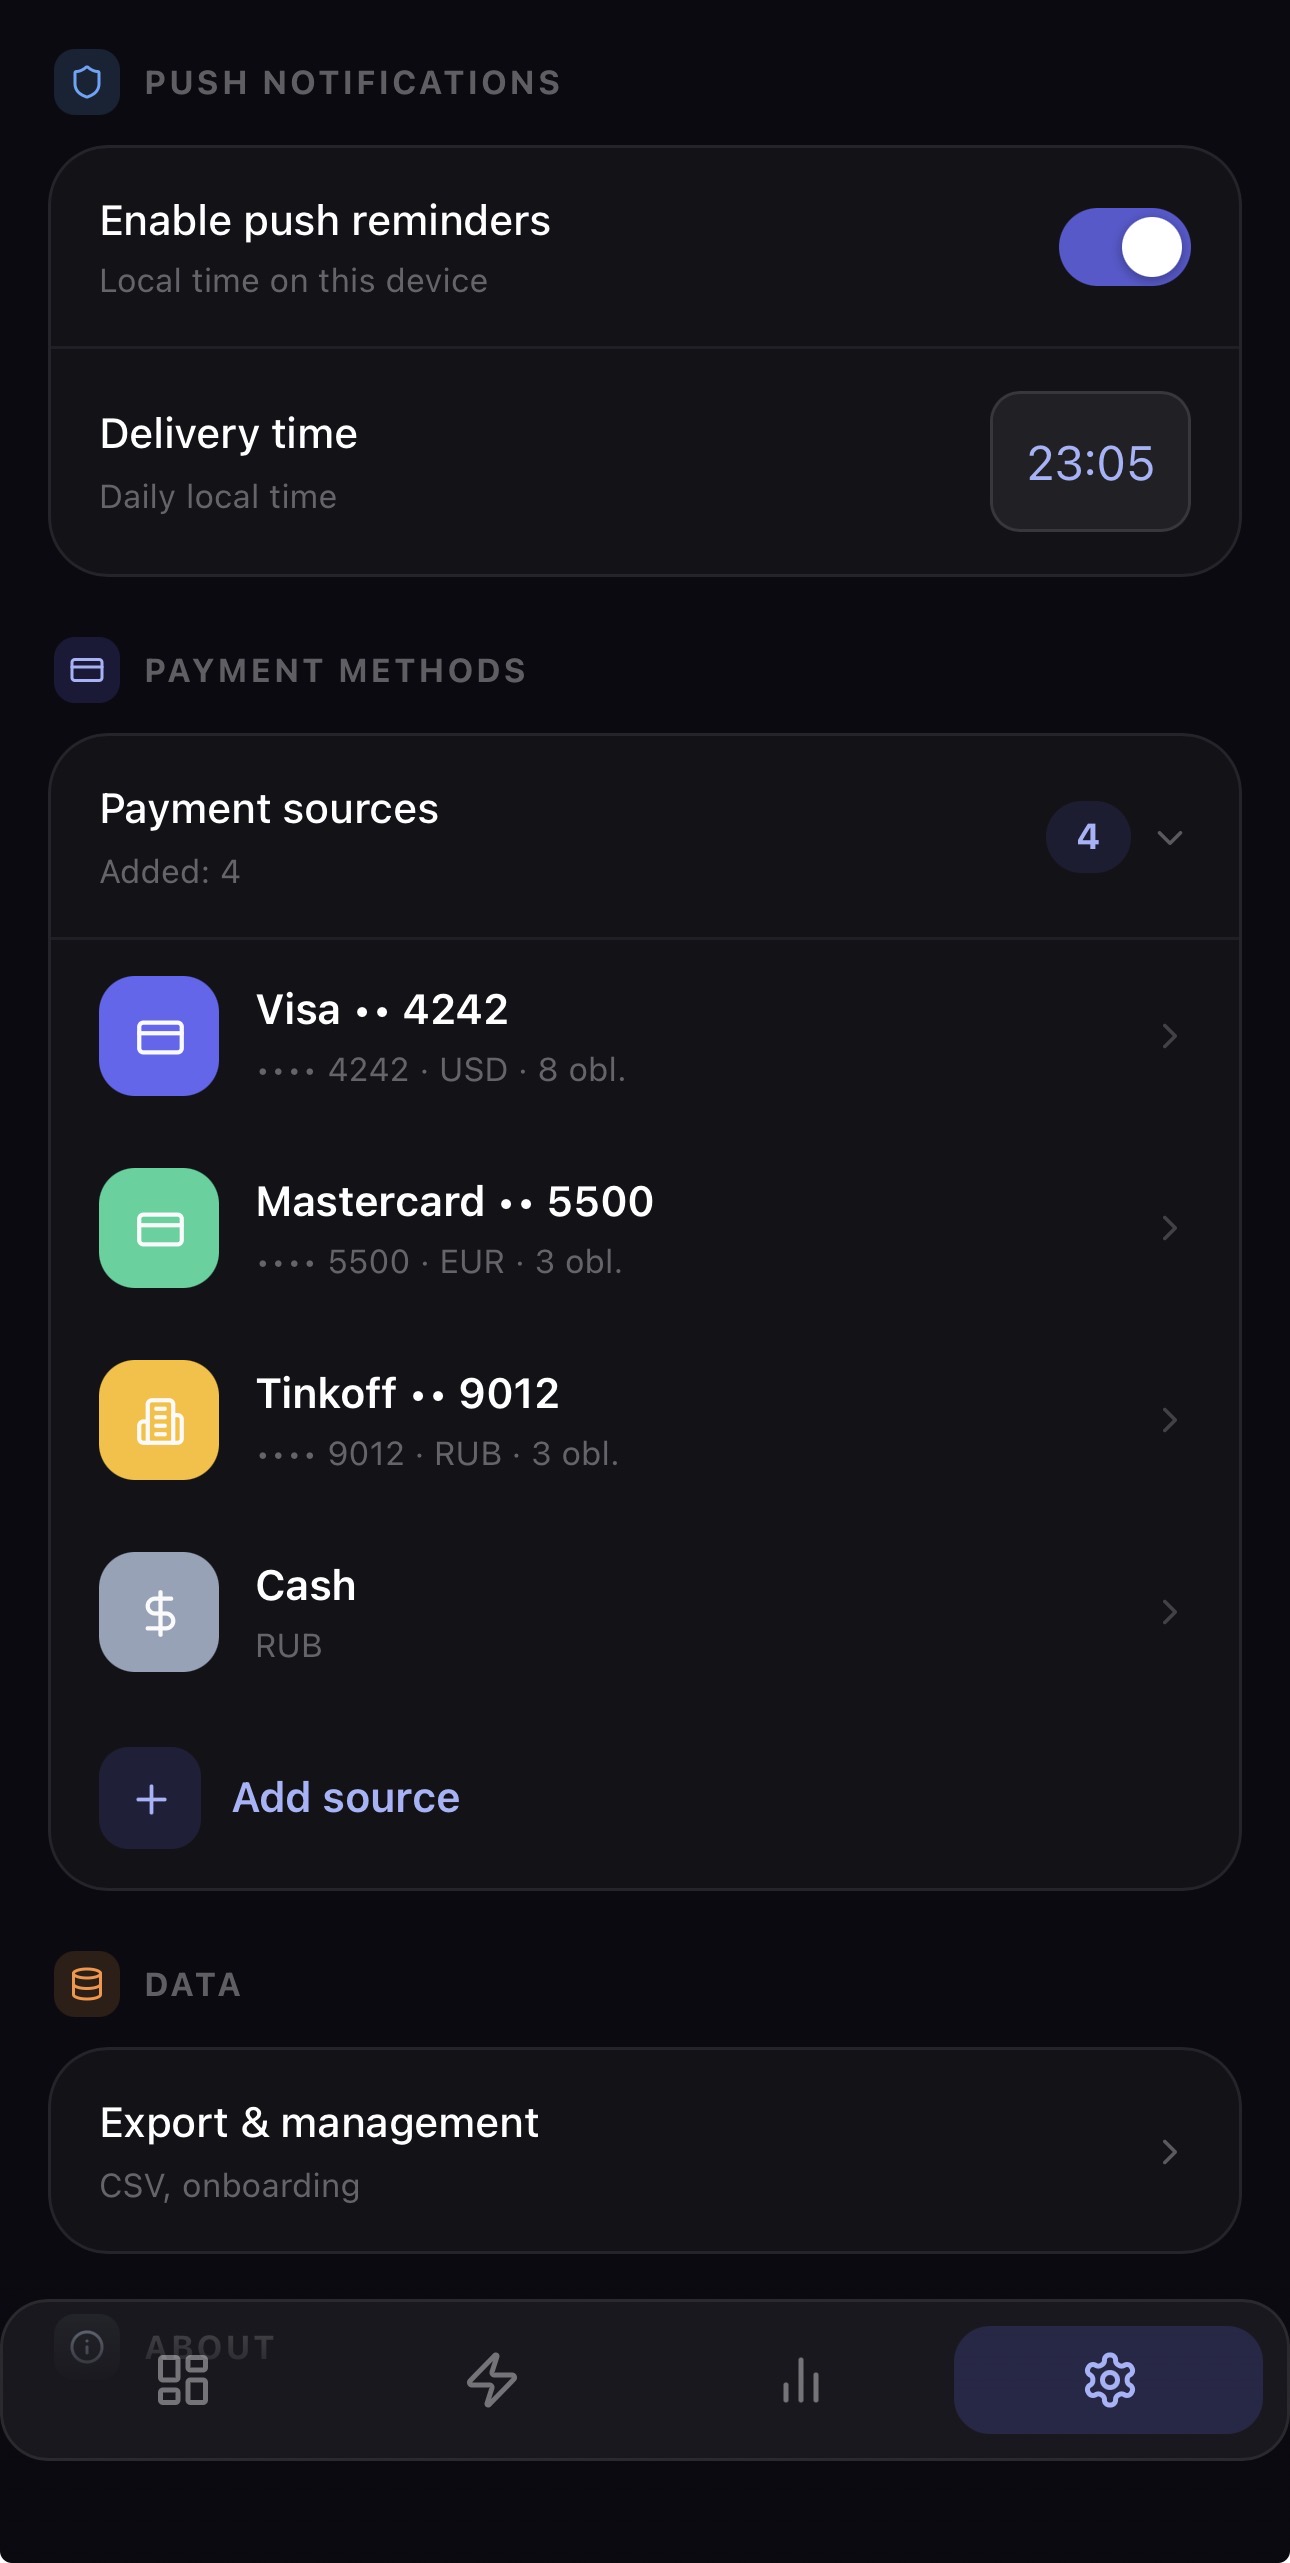
Payment sources are labels for the cards and accounts that your subscriptions charge. MONIQO never connects to your bank — you simply name your sources so you always know which card pays what.
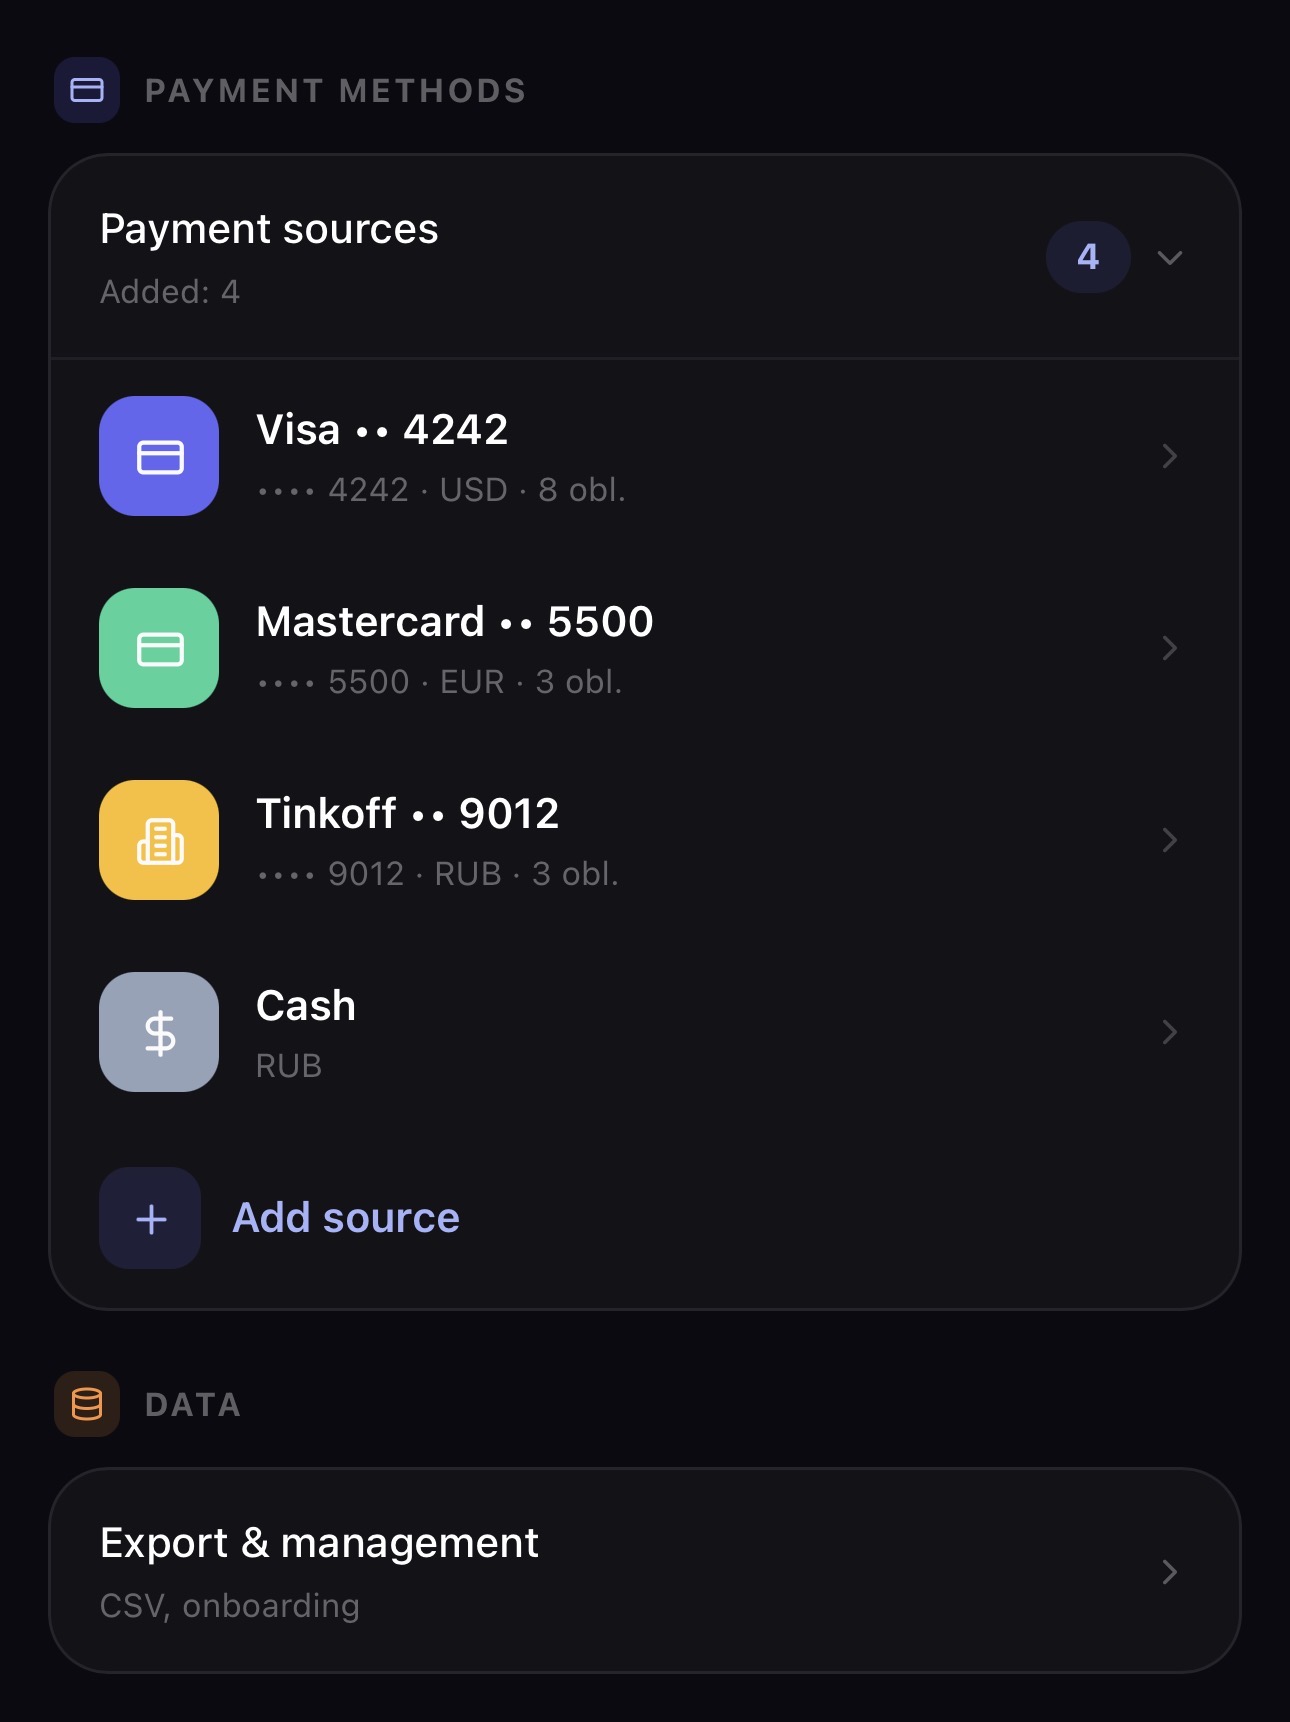 All your payment sources
 Manage sources in Settings
Go to Settings and open Payment Methods. The Payment Sources section shows all sources you've created.
Tap + and choose the source type: Card, Bank account, or Cash. Give it a name and optionally the last 4 digits of the card.
In each obligation's detail view, select the payment source. Analytics can then show how monthly load is distributed across sources.
Financial limits are set by currency and obligation type, not by payment source. Configure them in Settings or from the Dashboard Financial Load block.
Never miss a charge
MONIQO can send push notifications before a subscription renews so you can review, cancel, or prepare — before the money leaves.
 Upcoming reminders in timeline
 Payment history log
On first launch MONIQO asks for notification permission. You can also enable it later in iOS Settings → MONIQO → Notifications.
Open any obligation's detail view and turn on reminders. You can choose same day, 1 day, 2 days, 3 days, or 1 week before the due date.
Tap the notification to open MONIQO, then review the payment in Dashboard or Optimize. Upcoming payment cards let you mark paid, snooze, or skip.
MONIQO sends reminders automatically based on each subscription's next charge date. You don't need to set them up each month — they recur automatically with every billing cycle.
Frequently asked questions
No. MONIQO never connects to your bank, does not request bank credentials, and does not initiate or process any payments. Payment sources in MONIQO are just labels — organizational notes you create yourself (e.g. "Main card", "Business Amex"). Your financial data stays private and under your control.
Yes. MONIQO supports Subscription, Installment, and Fixed-term obligations in the manual add flow. You can track a phone installment plan, a one-off due payment, or another regular commitment alongside your streaming and cloud subscriptions.
Enable a reminder in any obligation's detail view and choose same day, 1 day, 2 days, 3 days, or 1 week in advance. MONIQO sends a push notification before each charge. Reminders repeat automatically with every billing cycle.
Yes. Each obligation can be tracked in its own currency. Supported currencies are USD, EUR, GBP, CAD, AUD, SEK, DKK, NOK, SGD, CHF, RUB, and TRY. The app uses static reference rates for base-currency guidance.
After the 14-day free trial, MONIQO switches to read-only mode. You can still view your subscriptions and data, but you won't be able to add or edit items. Subscribing to MONIQO Premium restores full access immediately. If you cancel before the trial ends, you are not charged.
MONIQO Premium is billed through Apple In-App Purchase. To cancel, go to iOS Settings → [your name] → Subscriptions → MONIQO → Cancel Subscription. You can also manage it through the App Store app. Your access continues until the end of the current billing period.
Yes. All your data is stored in your MONIQO account. Sign in with the same email on any device or after reinstalling and everything restores automatically — subscriptions, sources, history, and settings.
Go to Settings → Account → Delete Account. This permanently deletes all your data, subscriptions, payment sources, and history. There is no support ticket required. The deletion is immediate and irreversible.